

- 为您的账户设置计费:完成开发者和 Plus 计划的计费设置过程,包括旧账户的特殊说明。
- 更新您的信息:修改组织的发票电子邮件地址、业务信息和税号。
- 优化您的跟踪支出:了解如何通过数据保留管理和使用限制降低成本。
为您的账户设置计费
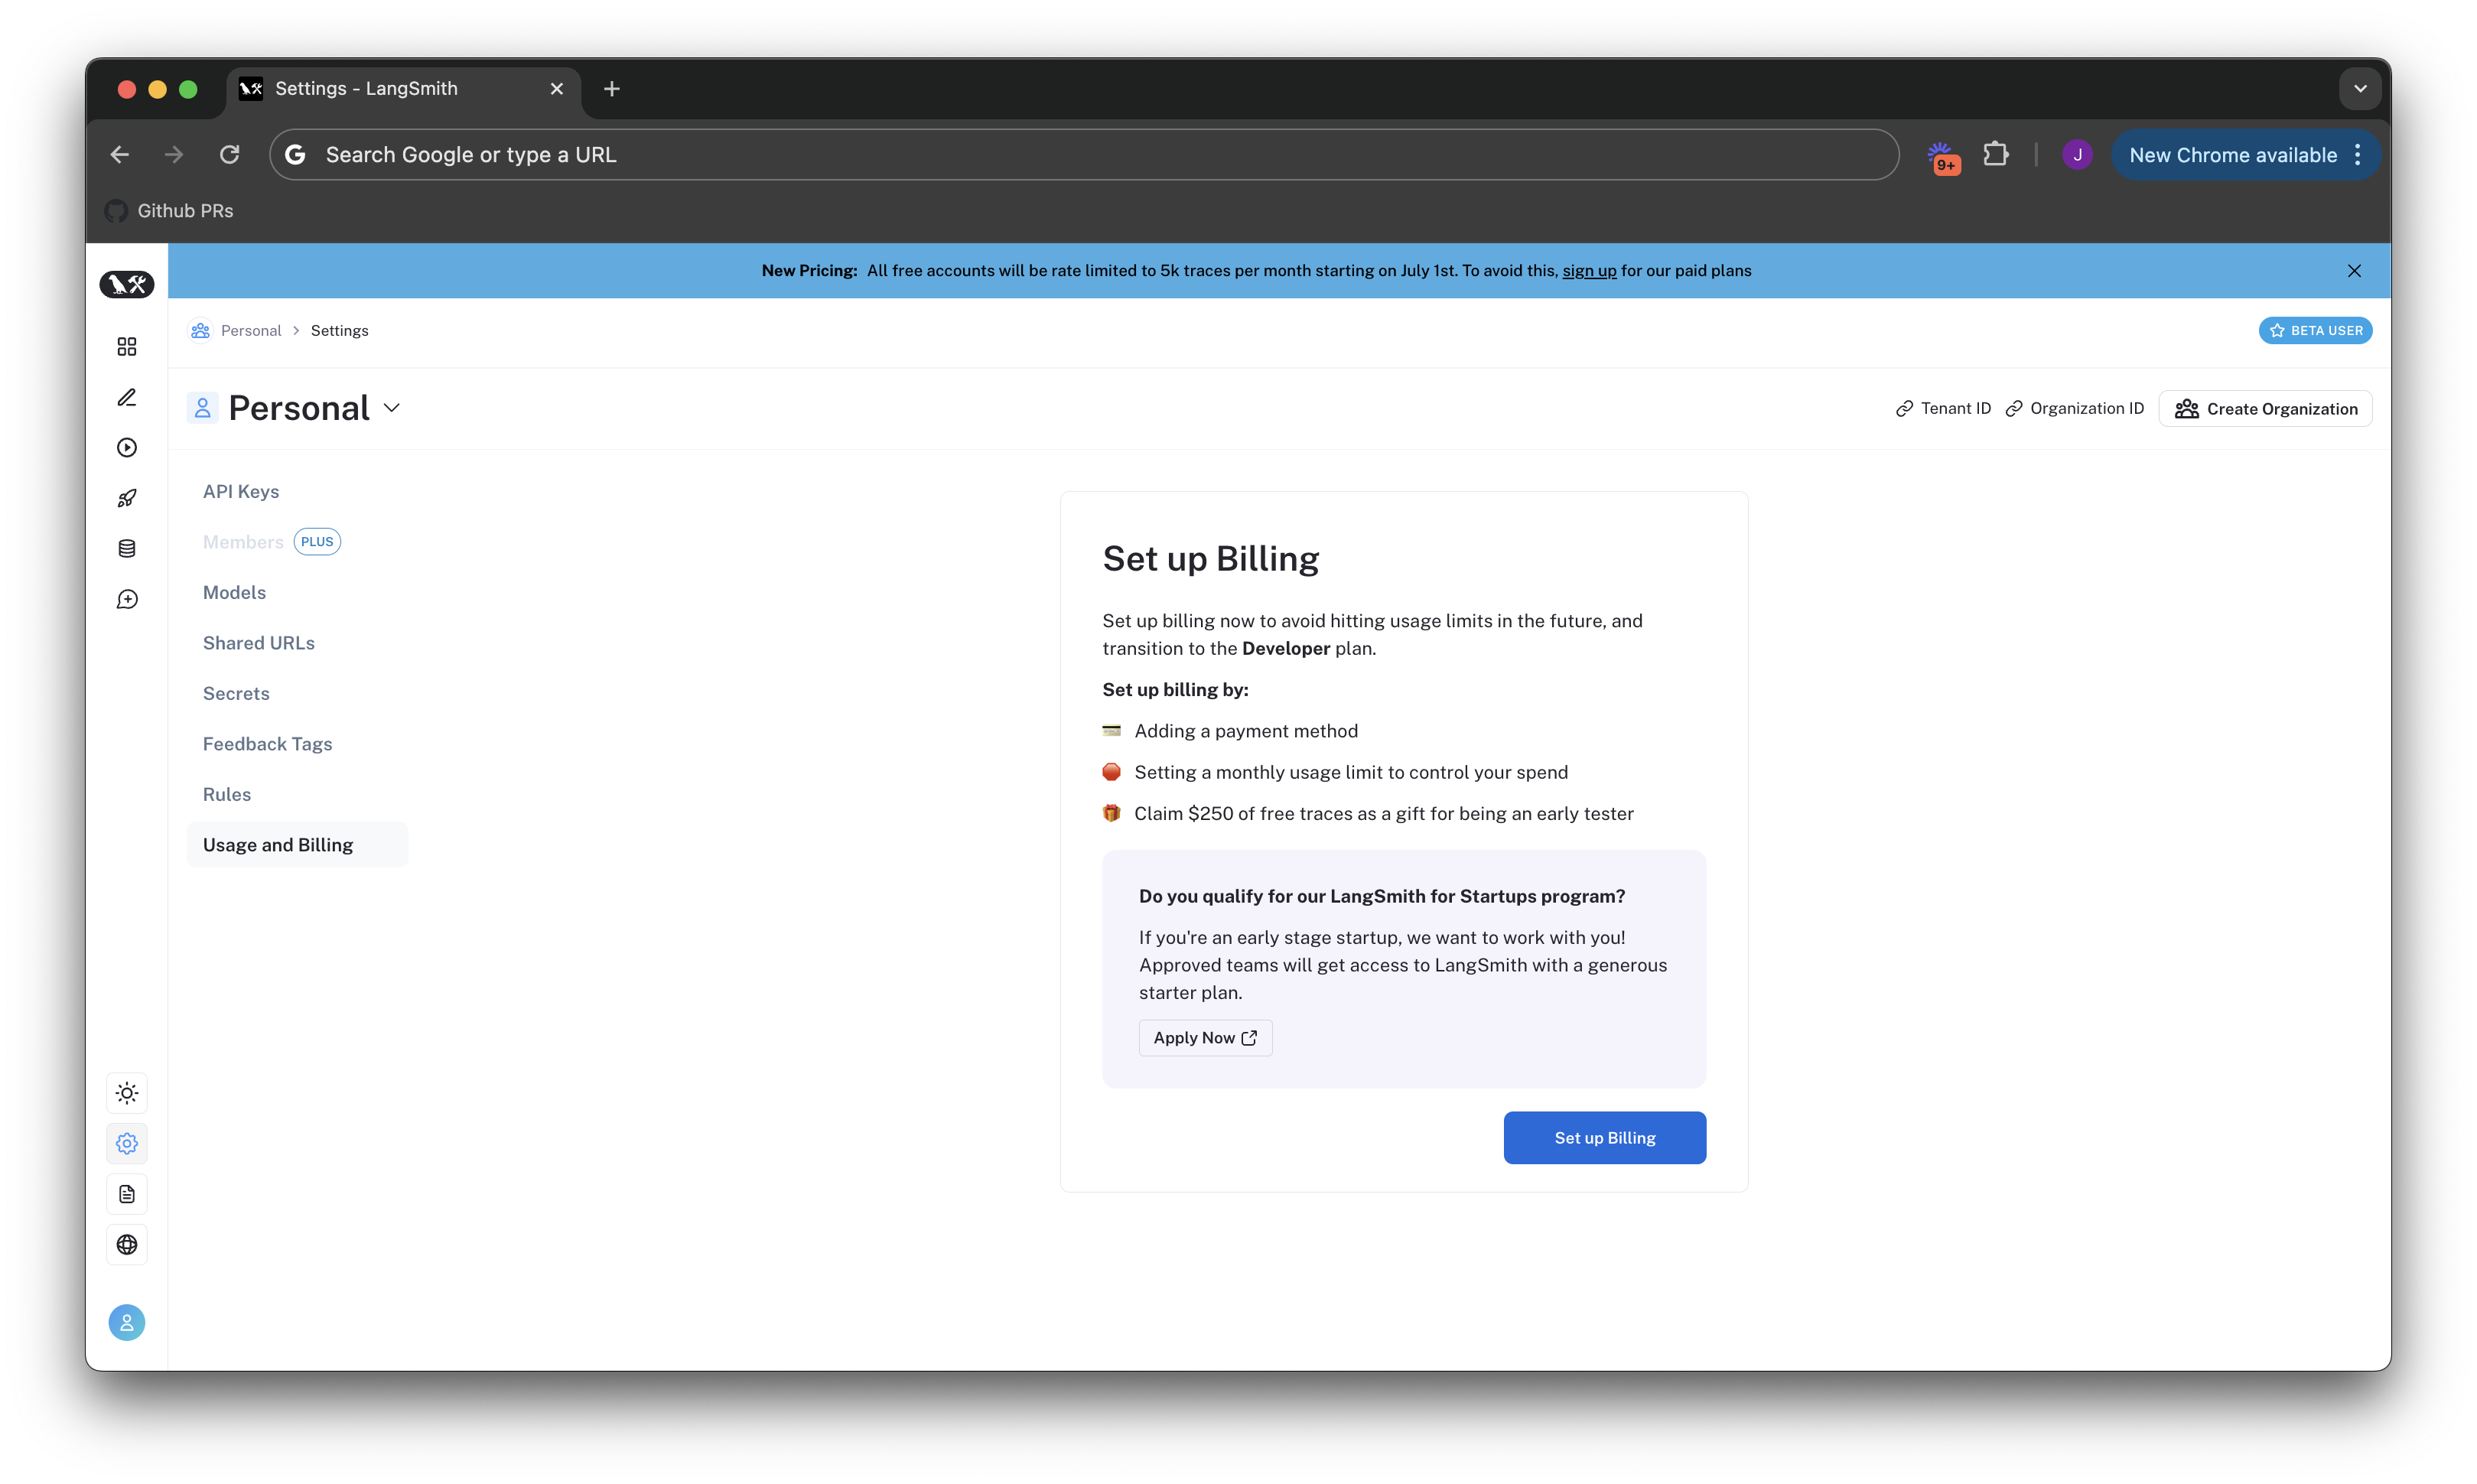
要为您的 LangSmith 组织设置计费,请导航到 Settings 下的 Usage and Billing 页面。根据您的组织设置,有不同的设置指南:
开发者计划:为您的个人组织设置计费
个人组织每月限制为 5000 条跟踪,直到添加信用卡。您可以在计划和计费页面上添加信用卡,步骤如下:- 单击设置计费。
- 添加您的信用卡信息。在此步骤之后,您将不再受到 5000 条跟踪的速率限制,并将按照定价页面上指定的费率对任何超出的跟踪收费。
Plus 计划:为共享组织设置计费
如果您尚未创建组织,则需要在设置计费之前遵循本指南。以下步骤假设您已经在新组织中。在输入信用卡信息之前,您无法使用新组织。完成以下步骤后,您将获得对 LangSmith 的完全访问权限。
- 在 Plus 页面上单击订阅。
如果您是使用 AI 构建的初创公司,请在 Startup 计划上单击立即申请。您可能有资格获得折扣价格和免费的每月跟踪配额。
- 审查您的现有成员。在订阅之前,LangSmith 允许您删除您不希望包含在账单中的任何已添加用户。
- 输入您的信用卡信息。然后,输入业务信息、发票电子邮件和税号。如果此组织属于企业,请选中这是企业复选框并相应输入信息。
为定价引入之前创建的账户设置计费
如果您在 2024 年 4 月 2 日引入定价之前加入 LangSmith,您可以选择升级现有账户以设置计费。如果您在 2024 年 7 月 8 日之前未设置计费,则您的账户现在每月限制为最多 5,000 条跟踪。- 导航到设置页面。
- 单击设置计费。
- 输入您的信用卡信息。如果您在个人组织上,这将使您加入开发者计划。如果您在共享组织上,这将使您加入 Plus 计划。有关更多信息,请分别从第 2 步开始参考开发者或 Plus 计划的指南。
- 领取免费积分,作为对早期 LangSmith 用户的感谢。
Update your information
To update business information for your LangSmith organization, head to the Usage and Billing page under Settings and click on the Plans and Billing tab.Business information, tax ID, and invoice email can only be updated for the Plus and Startup plans. Free and Developer plans cannot update this information.
Invoice email
 To update the email address for invoices, follow these steps:
- Navigate to the Plans and Billing tab.
- Locate the section beneath the payment method, where the current invoice email is displayed.
- Enter the new email address for invoices in the provided field.
- The new email address will be automatically saved.
Business information and tax ID
In certain jurisdictions, LangSmith is required to collect sales tax. If you are a business, providing your tax ID may qualify you for a sales tax exemption.
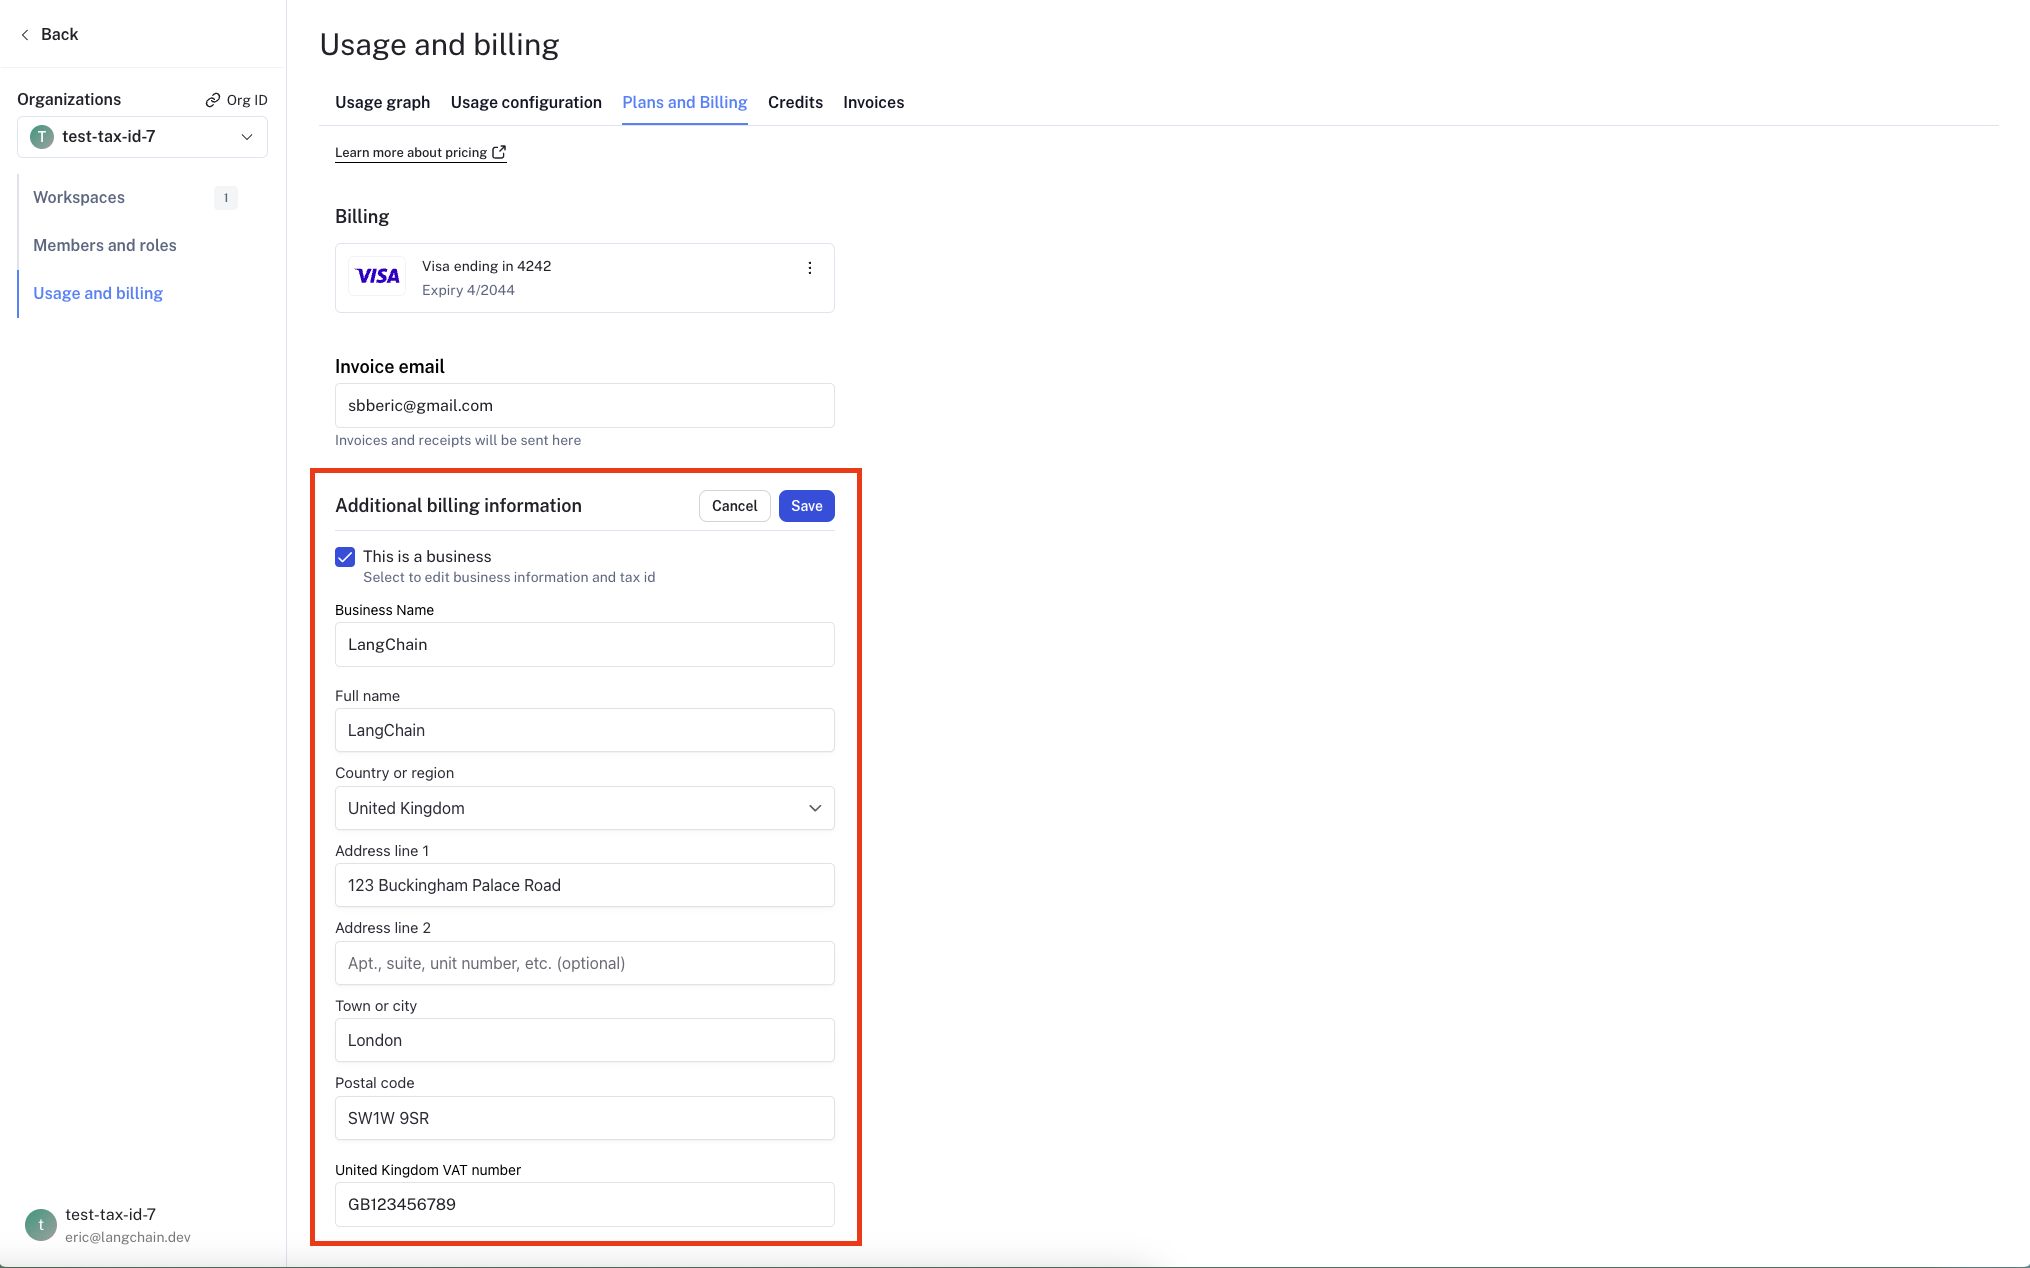 To update your organization’s business information, follow these steps:
- Navigate to the Plans and Billing tab.
- Below the invoice email section, you will find a checkbox labeled Business.
- Check the Business checkbox if your organization belongs to a business.
- A business information section will appear, allowing you to enter or update the following details:
- Business Name
- Address
- Tax ID for applicable jurisdictions
- A Tax ID field will appear for applicable jurisdictions after you select a country.
- After entering the necessary information, click the Save button to save your changes.
Optimize your tracing spend
You may find it helpful to read the following pages, before continuing with this section on optimizing your tracing spend:
Some of the features mentioned in this guide are not currently available on Enterprise plan due to its custom nature of billing. If you are on the Enterprise plan and have questions about cost optimization, reach out to your sales rep or support@langchain.dev.
- Reducing existing costs with data retention policies.
- Preventing future overspend with usage limits.
Dev, Staging, and Prod):

Understand your current usage
The first step of any optimization process is to understand current usage. LangSmith provides two ways to do this: Usage graph and Invoices.Usage graph
The usage graph lets you examine how much of each usage-based pricing metric you have consumed. It does not directly show spend (which you will review later in the draft invoice). You can navigate to the usage graph under Settings -> Usage and Billing -> Usage Graph.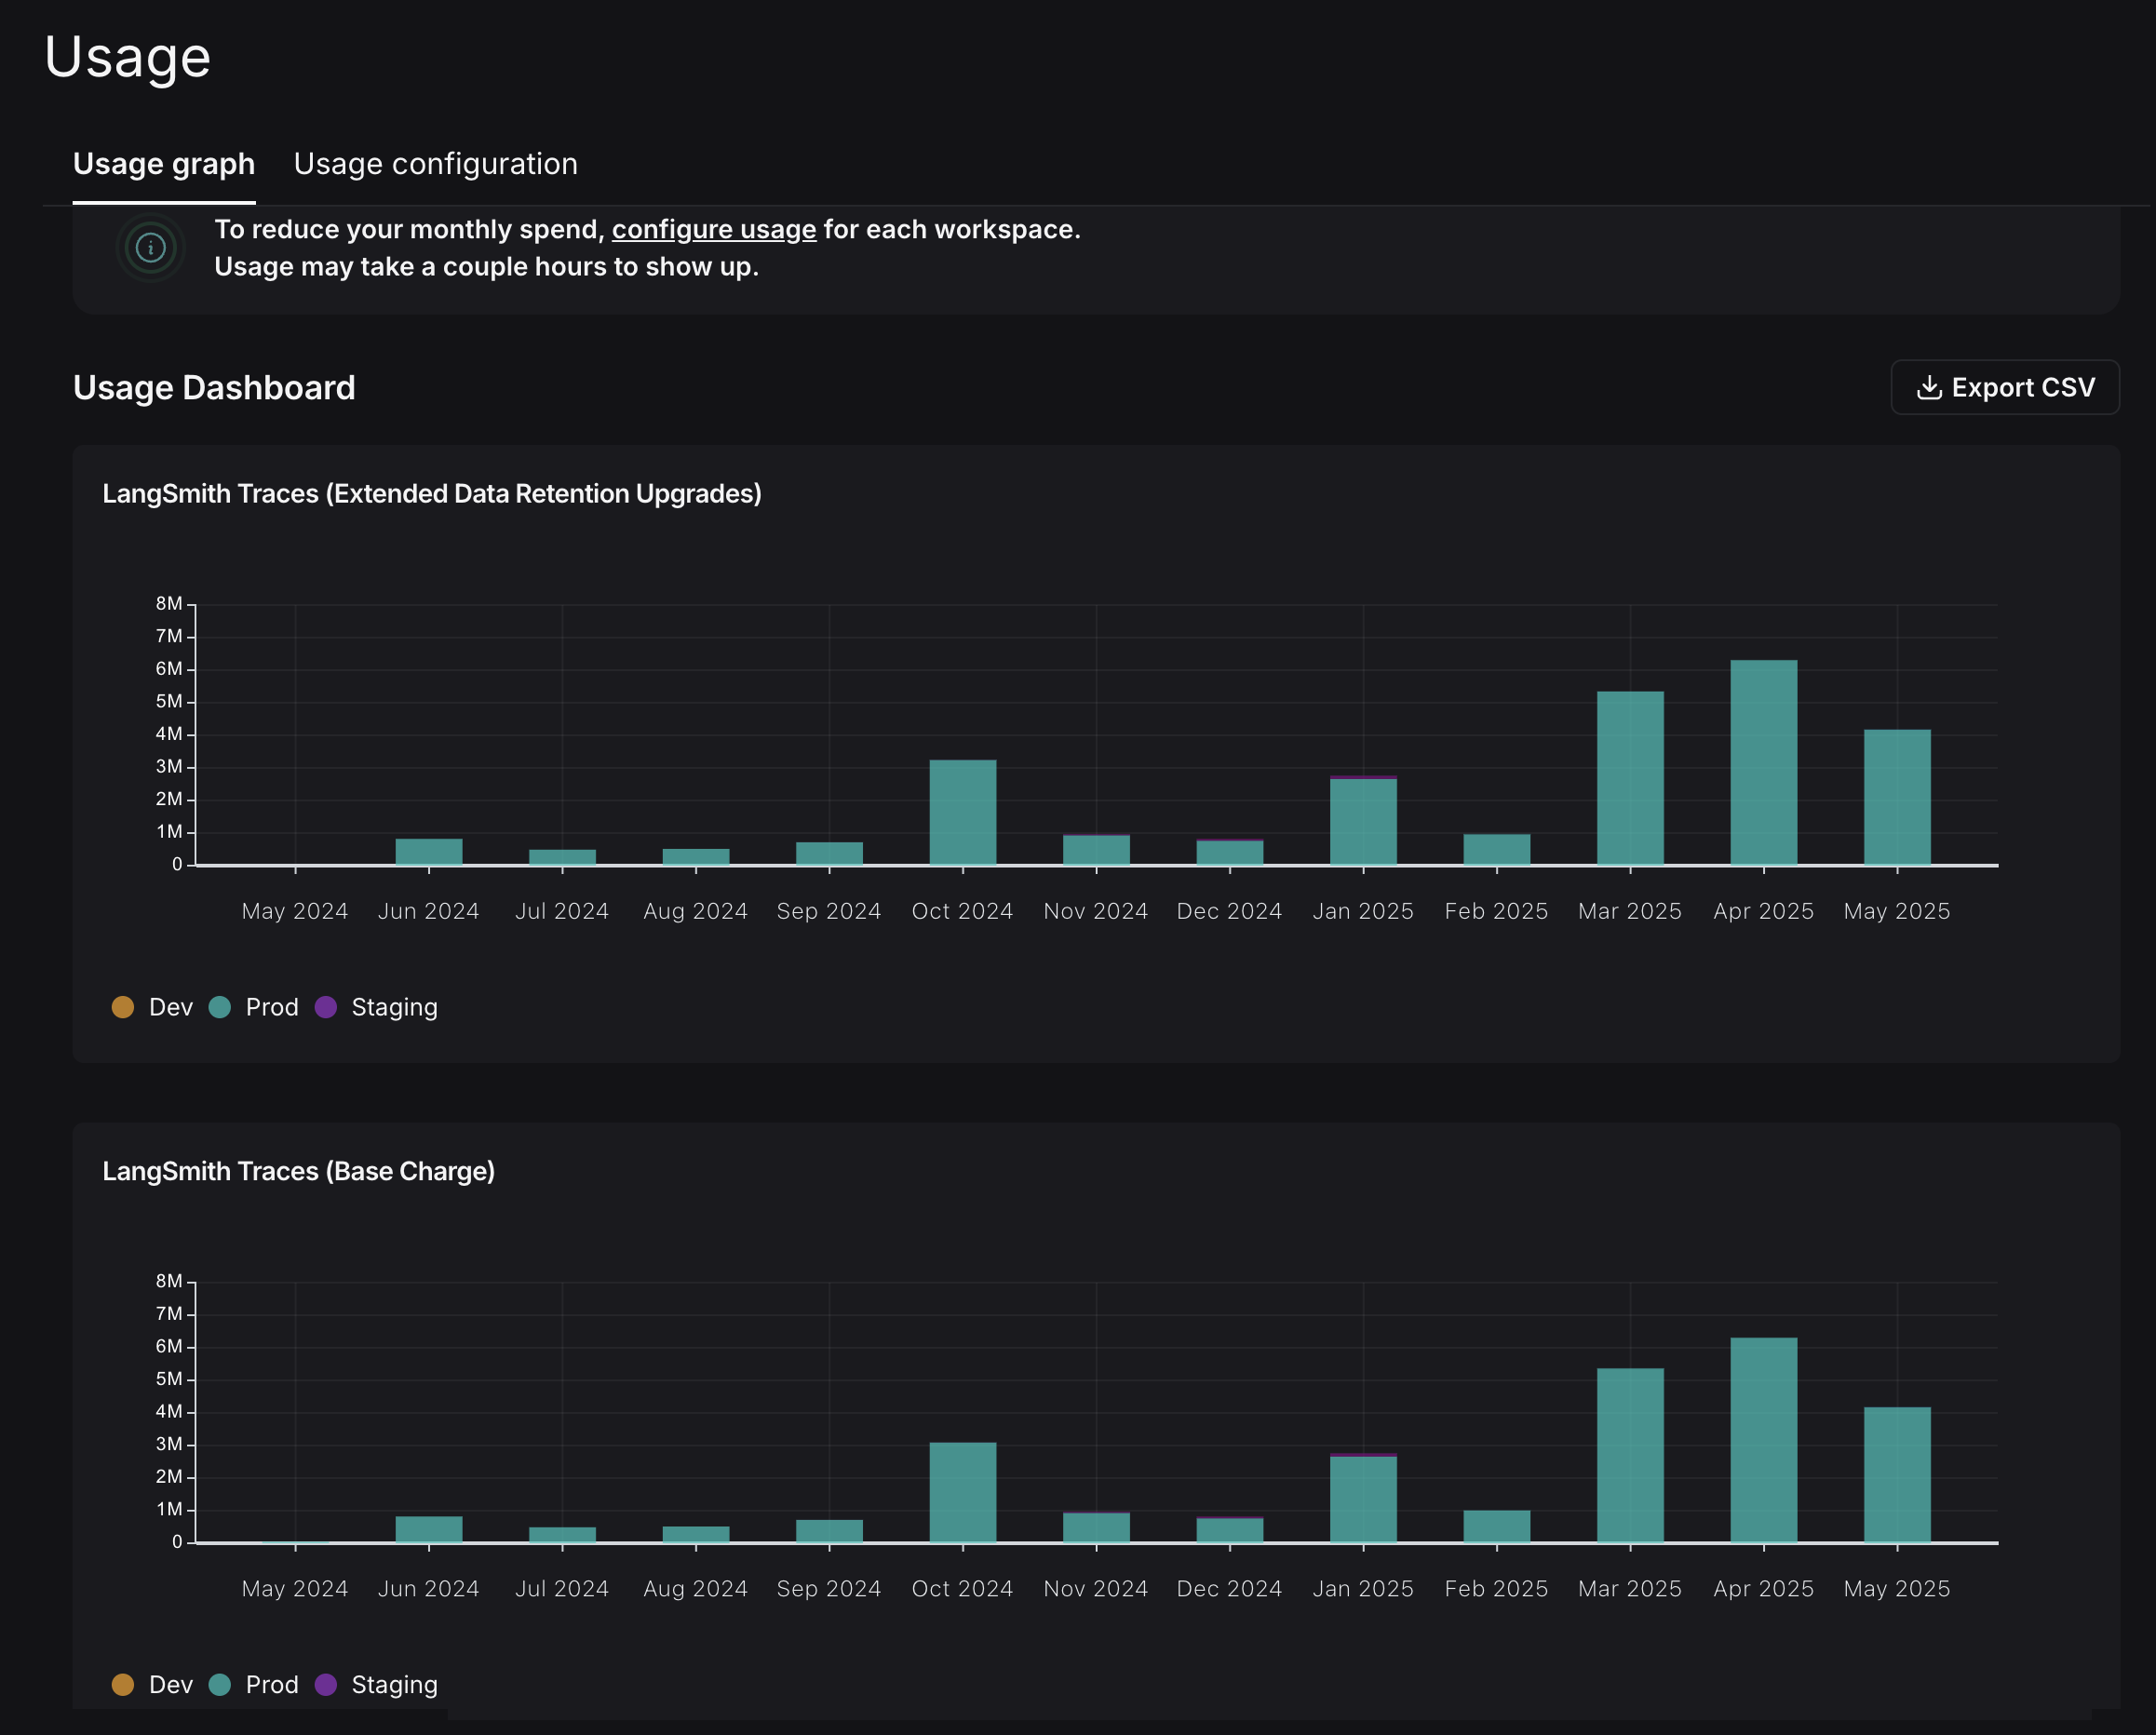 This graph shows that there are two usage metrics that LangSmith charges for:
- LangSmith Traces (Base Charge): tracks all traces that you send to LangSmith.
- LangSmith Traces (Extended Data Retention Upgrades): tracks all traces that also have our Extended 400 Day Data Retention.
Invoices
You understand what usage looks like in terms of traces, but you now need to translate that into spend. To do so, navigate to the Invoices tab. The first invoice that will appear on screen is a draft of your current month’s invoice, which shows your running spend thus far this month.
LangSmith’s Usage Graph and Invoice use the term
tenant_id to refer to a workspace ID. They are interchangeable.- You use extended data retention tracing, which means by default your traces are retained for 400 days.
- You use base data retention tracing and use a feature that automatically extends the data retention of a trace. (Refer to the Auto-Upgrade conceptual docs.)
Optimization 1: manage data retention
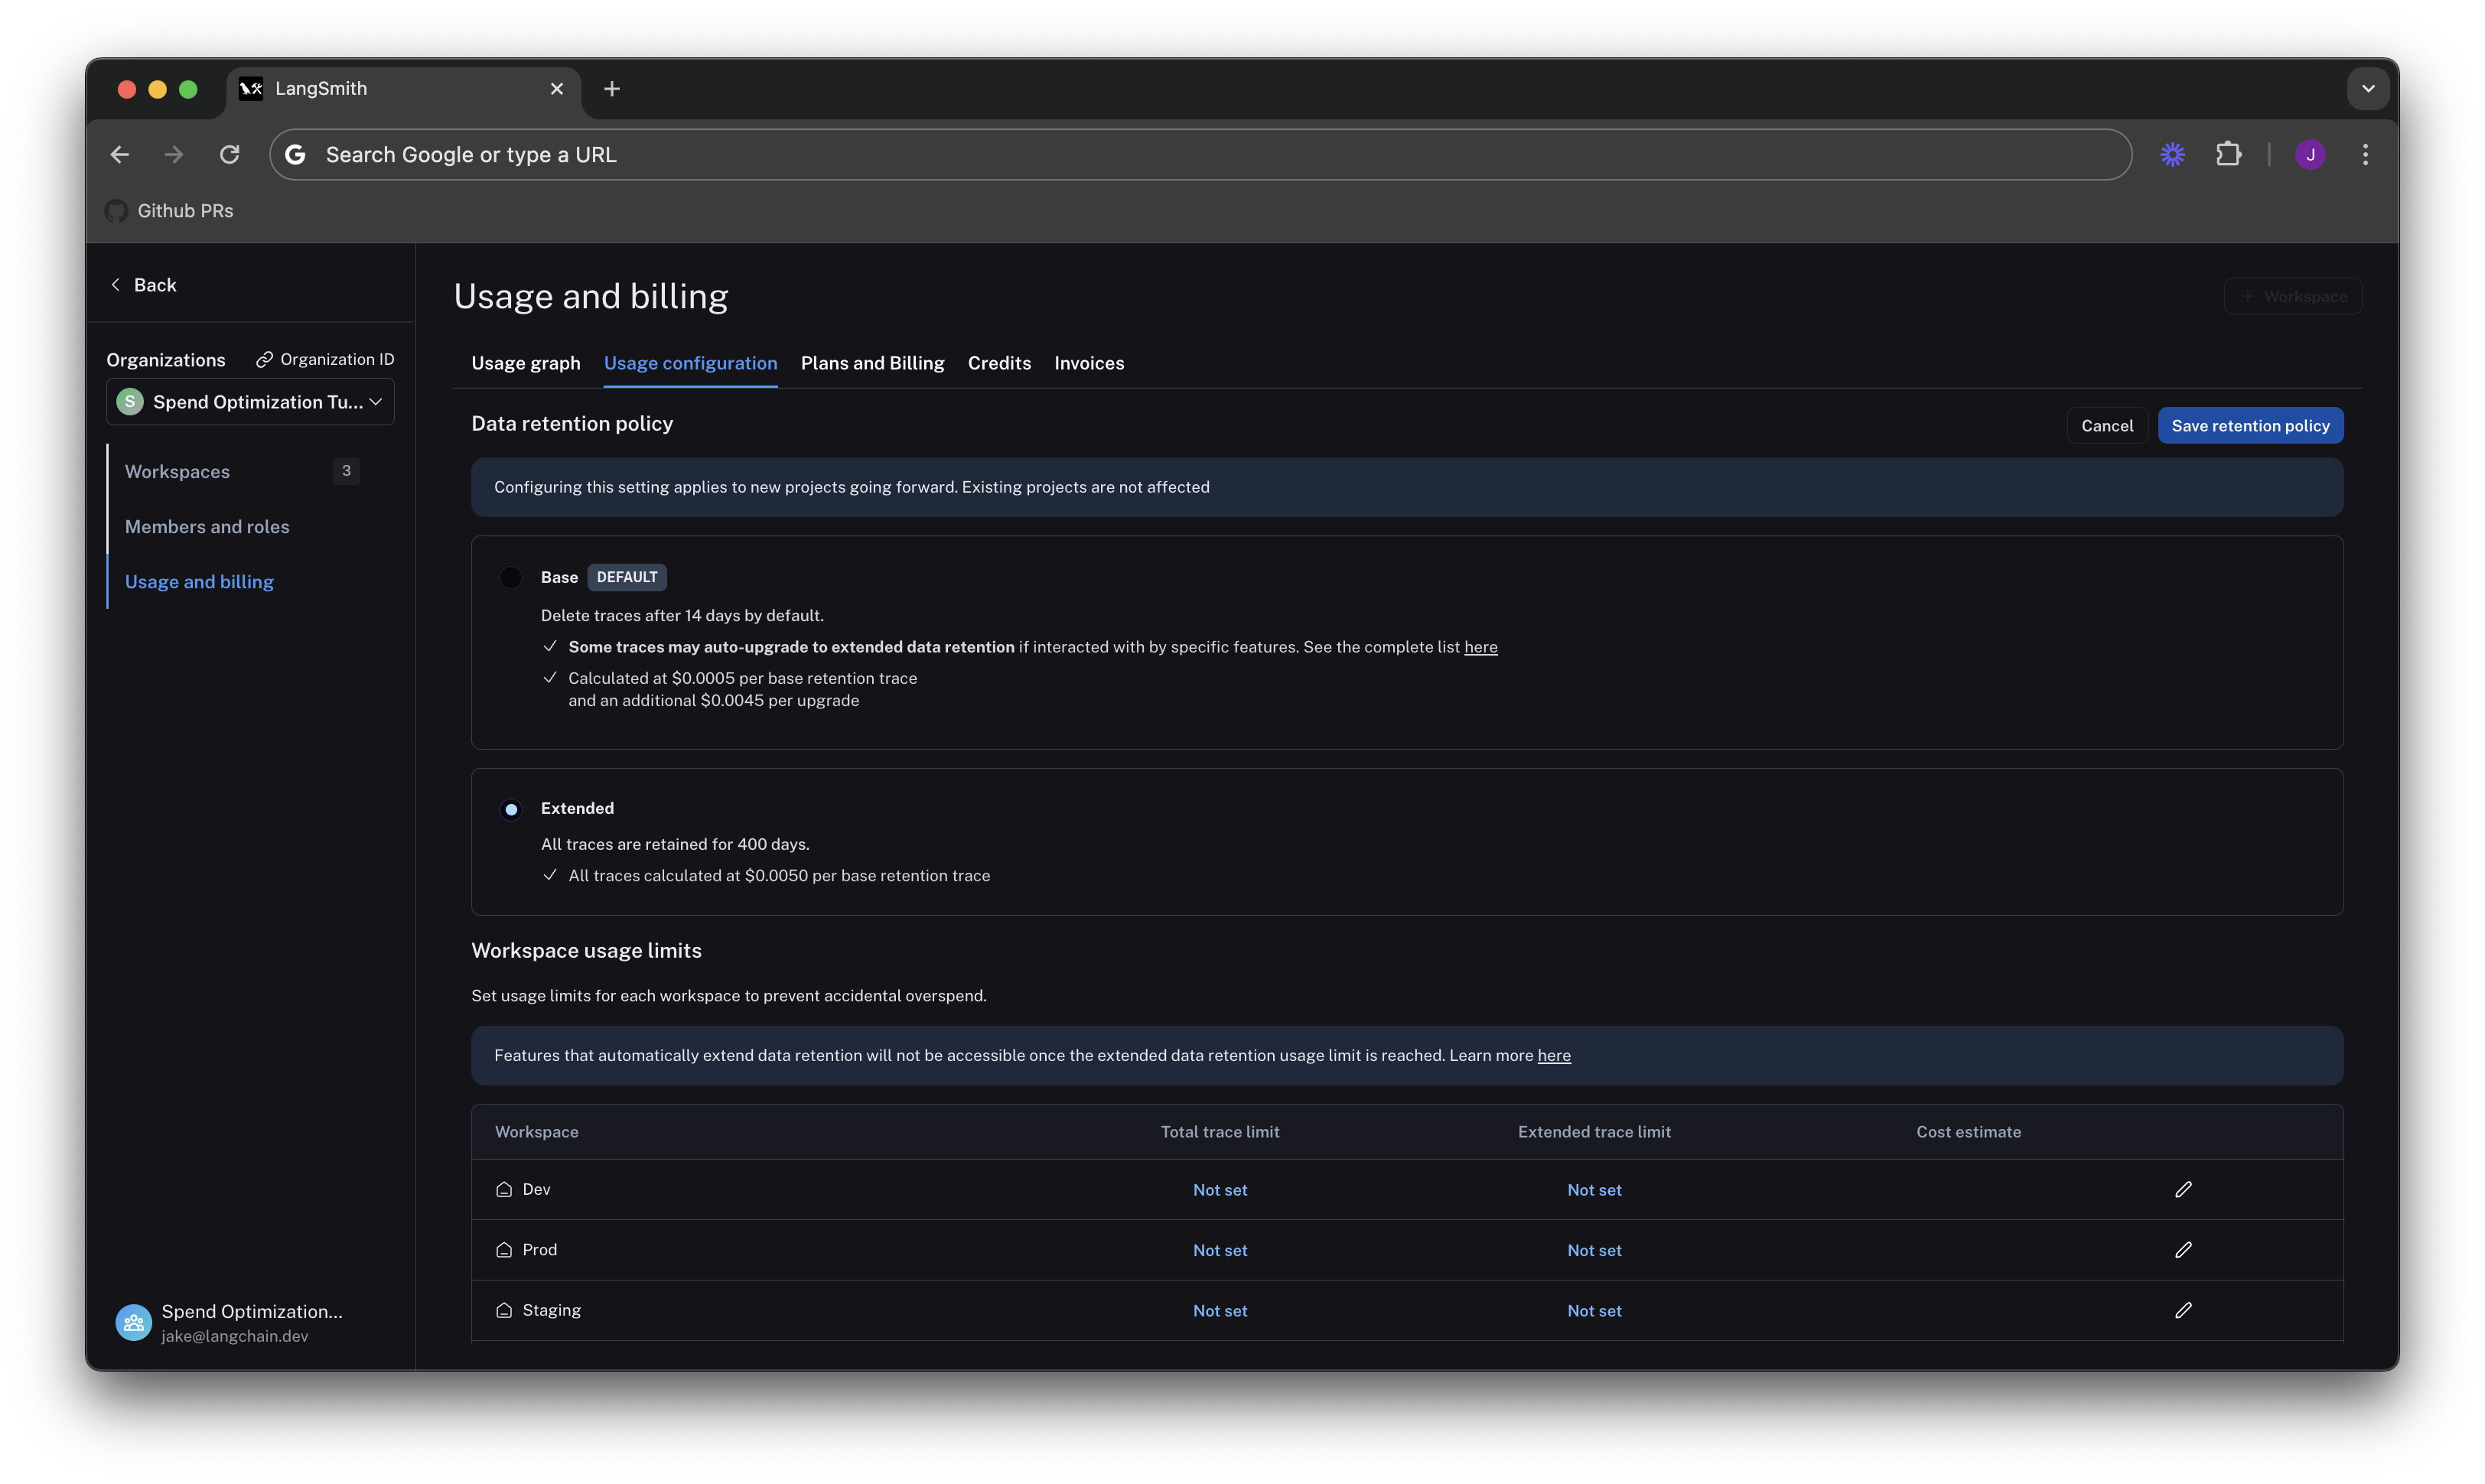
LangSmith charges differently based on a trace’s data retention, where short-lived traces are an order of magnitude less expensive than ones that last for a long time. In this optimization, you’ll learn how to get optimal settings for data retention without sacrificing historical observability, and see the effect it has on the bill.Change org level retention defaults for new projects
Navigate to the Usage configuration tab, and look at the organization level retention settings. Modifying this setting affects all new projects that are created going forward in all workspaces in the organizaton.For backwards compatibility, older organizations may have this defaulted to Extended. Organizations created after June 3rd, 2024 have this defaulted to Base.
Change project level retention defaults
Data retention settings are adjustable per project on the tracing project page. Navigate to Projects > Your project name > Select Retention and modify the default retention of the project to Base. This will only affect retention (and pricing) for traces going forward.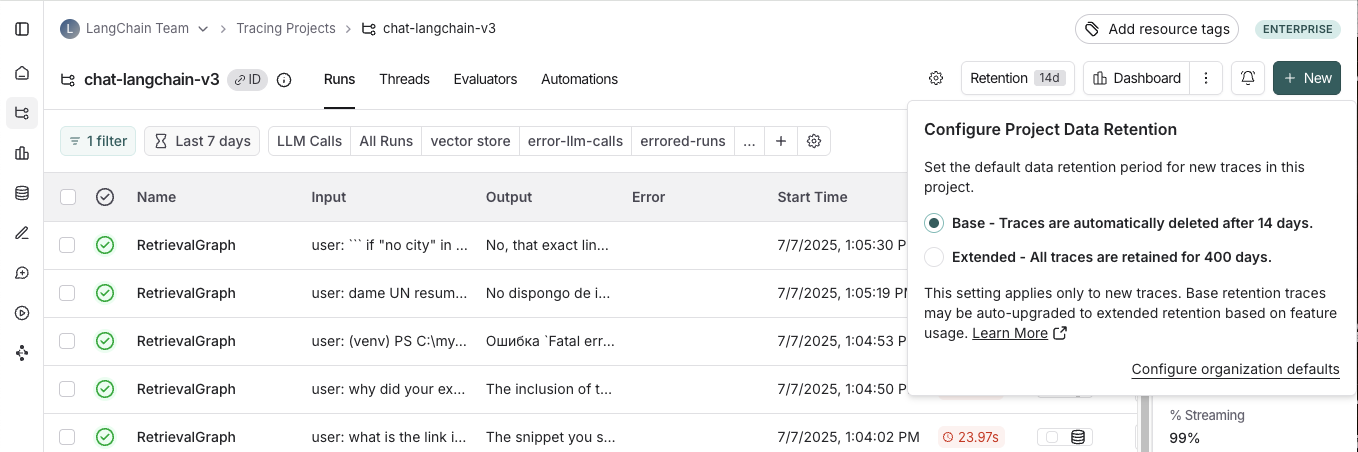
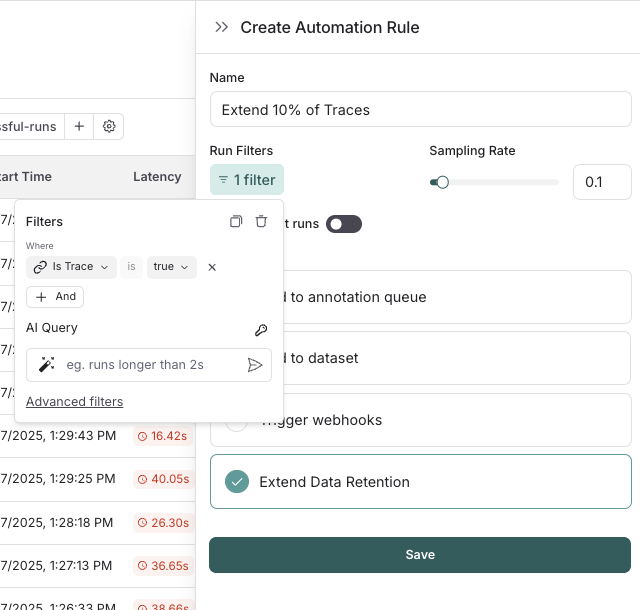
Apply extended data retention to a percentage of traces
You may not want all traces to expire after 14 days. You can automatically extend the retention of traces that match some criteria by creating an automation rule. You might want to apply extended data retention to specific types of traces, such as:- 10% of all traces: For general analysis or analyzing trends long term.
- Errored traces: To investigate and debug issues thoroughly.
- Traces with specific metadata: For long-term examination of particular features or user flows.
- Navigate to Projects > Your project name > Select + New > Select New Automation.
- Name your rule and optionally apply filters or a sample rate. For more information on configuring filters, refer to filtering techniques.
For example, this is the expected configuration to keep 10% of all traces for extended data retention:
 If you want to keep a subset of traces for longer than 400 days for data collection purposes, you can create another run rule that sends some runs to a dataset of your choosing. A dataset allows you to store the trace inputs and outputs (e.g., as a key-value dataset), and will persist indefinitely, even after the trace gets deleted.
See results after 7 days
While the total amount of traces per day stayed the same, the extended data retention traces was cut heavily. In the invoice, the spend reduced to roughly $900 in the last 7 days, as opposed to $2,000 in the previous 4. That’s a cost reduction of nearly 75% per day.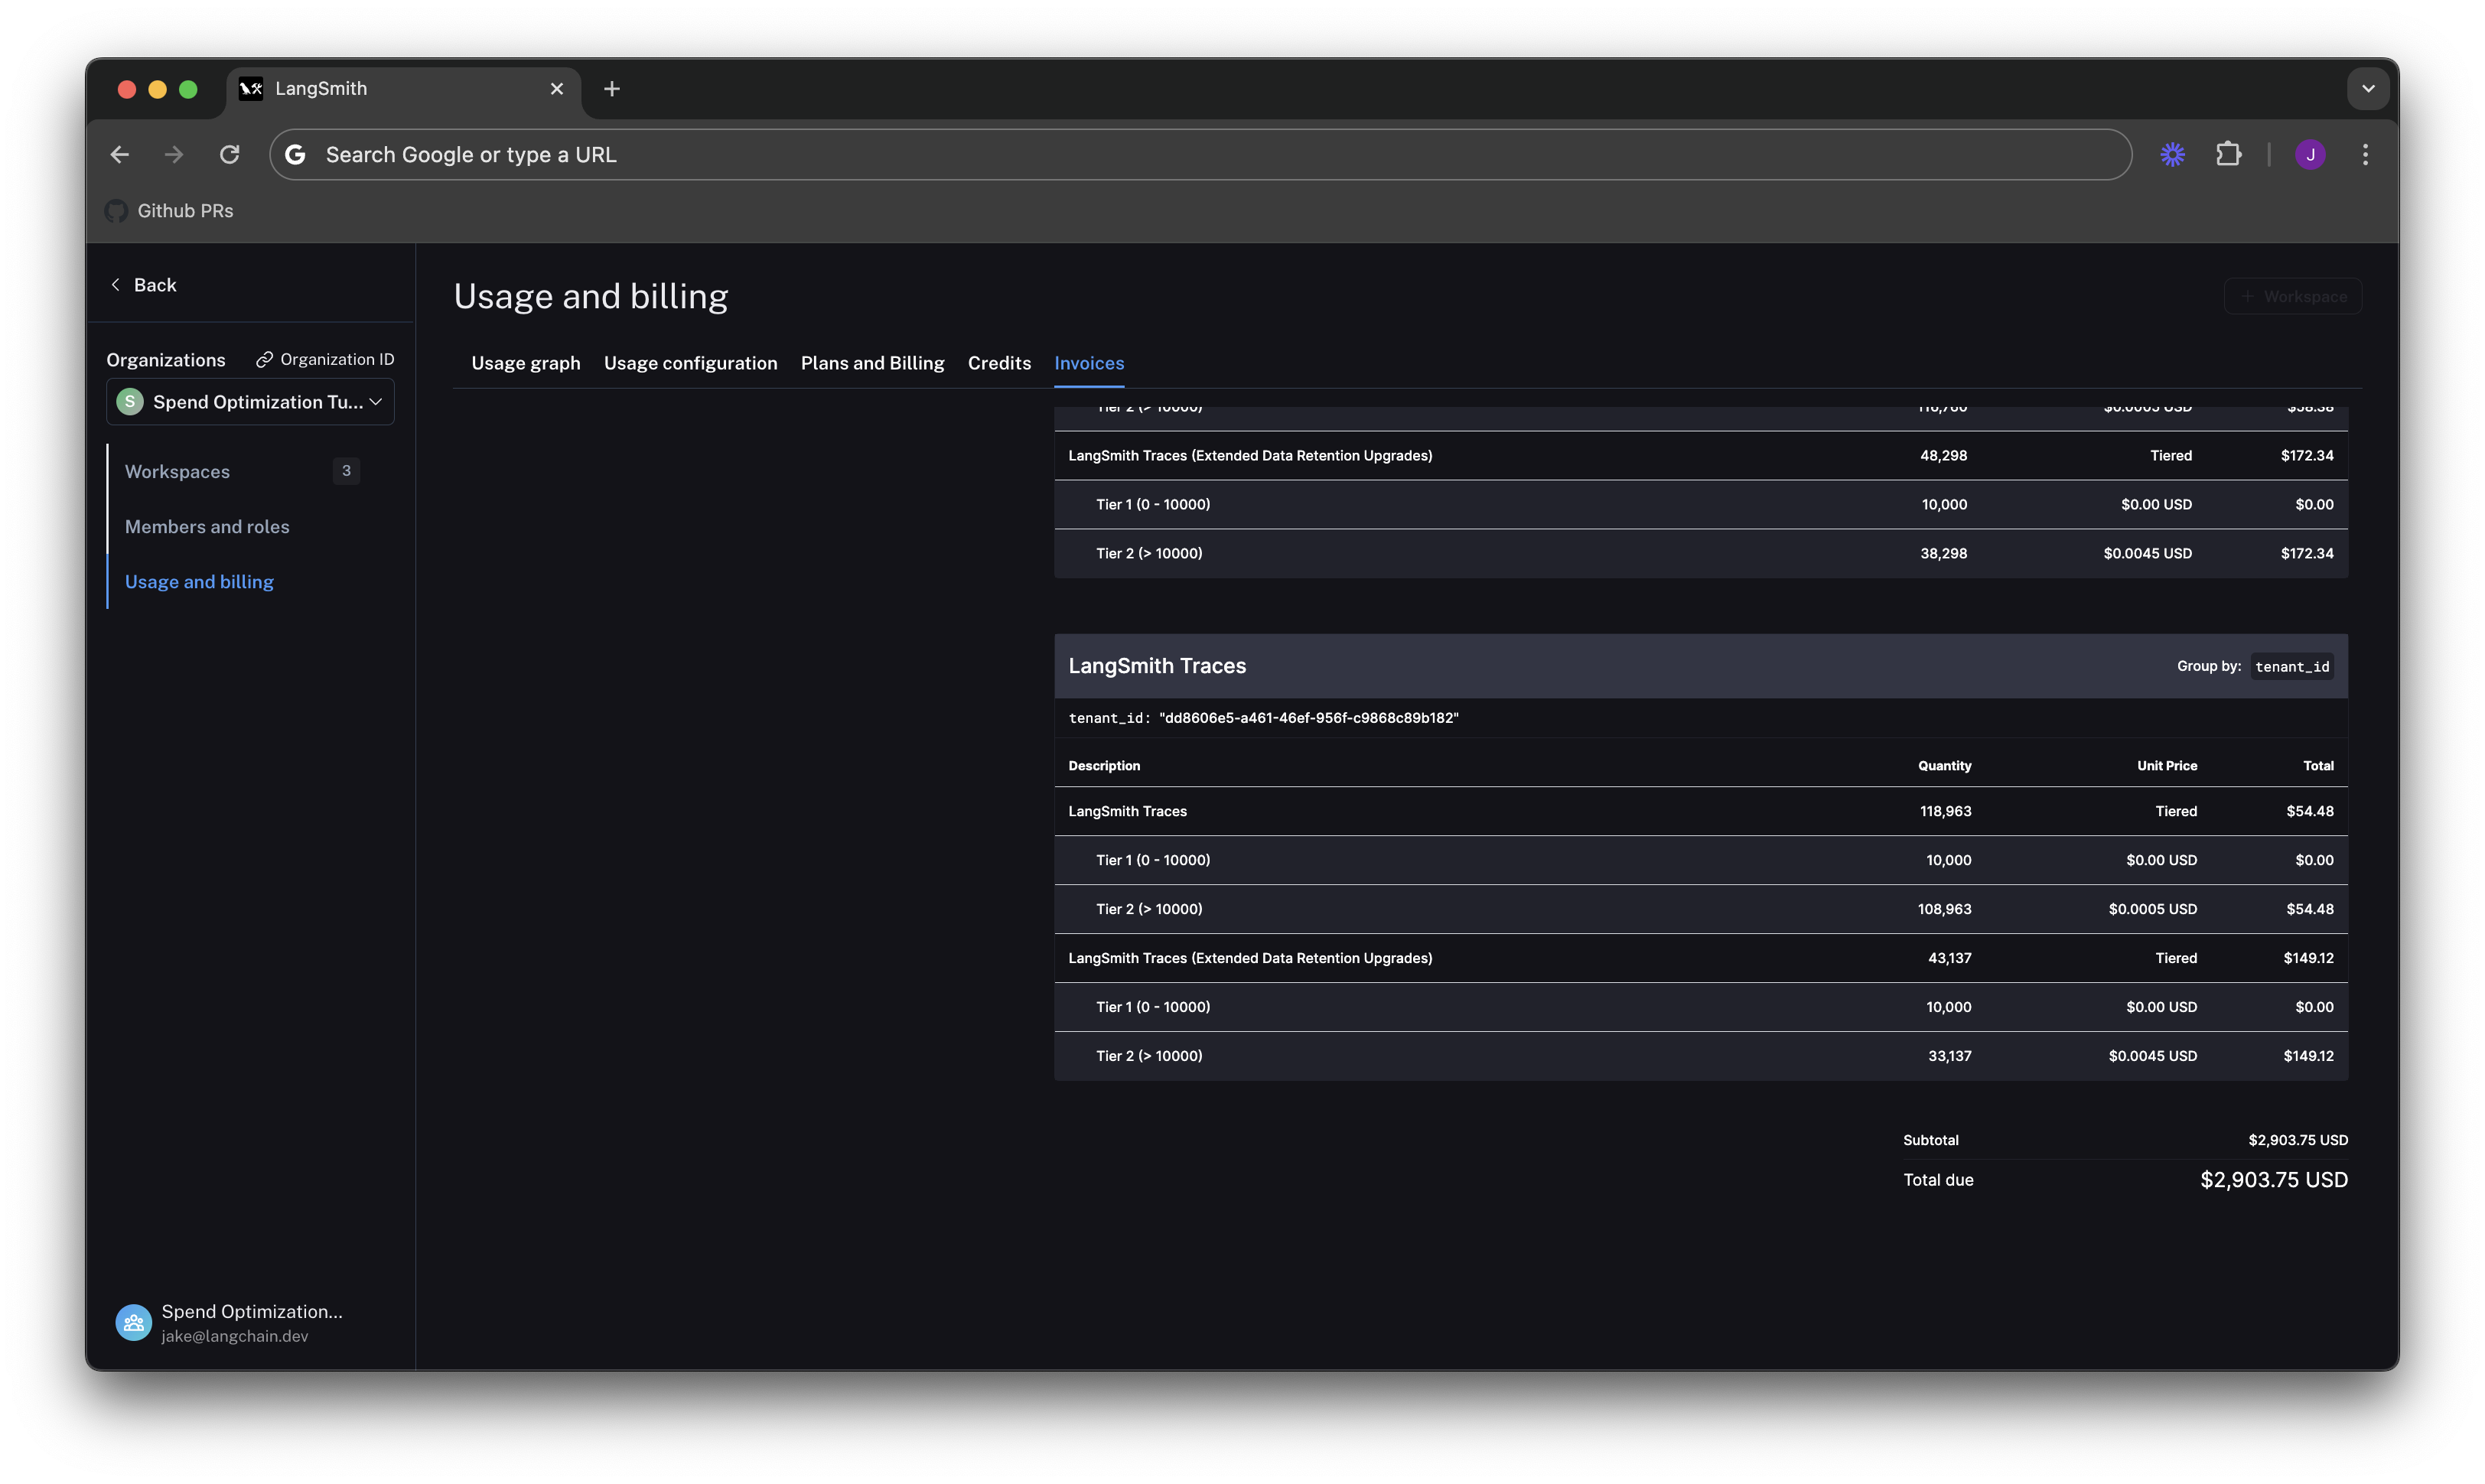
Optimization 2: limit usage
In the previous section, you managed data retention settings to optimize existing spend. In this section, you will use usage limits to prevent future overspend. LangSmith has two usage limits: total traces and extended retention traces. These correspond to the two metrics tracked on the usage graph. You can use these in tandem to have granular control over spend. To set limits, navigate back to Settings -> Usage and Billing -> Usage configuration. There is a table at the bottom of the page that lets you set usage limits per workspace. For each workspace, the two limits appear, along with a cost estimate:Set a good total traces limit
Picking the right total traces limit depends on the expected load of traces that you will send to LangSmith. It is important to consider potential growth before setting a limit. For example:- Current Load: The gen AI application is called between 1.2-1.5 times per second, and each API request has a trace associated with it, meaning it logs around 100,000-130,000 traces per day.
- Expected Growth in Load: The expectation is that this will double in size in the near future.
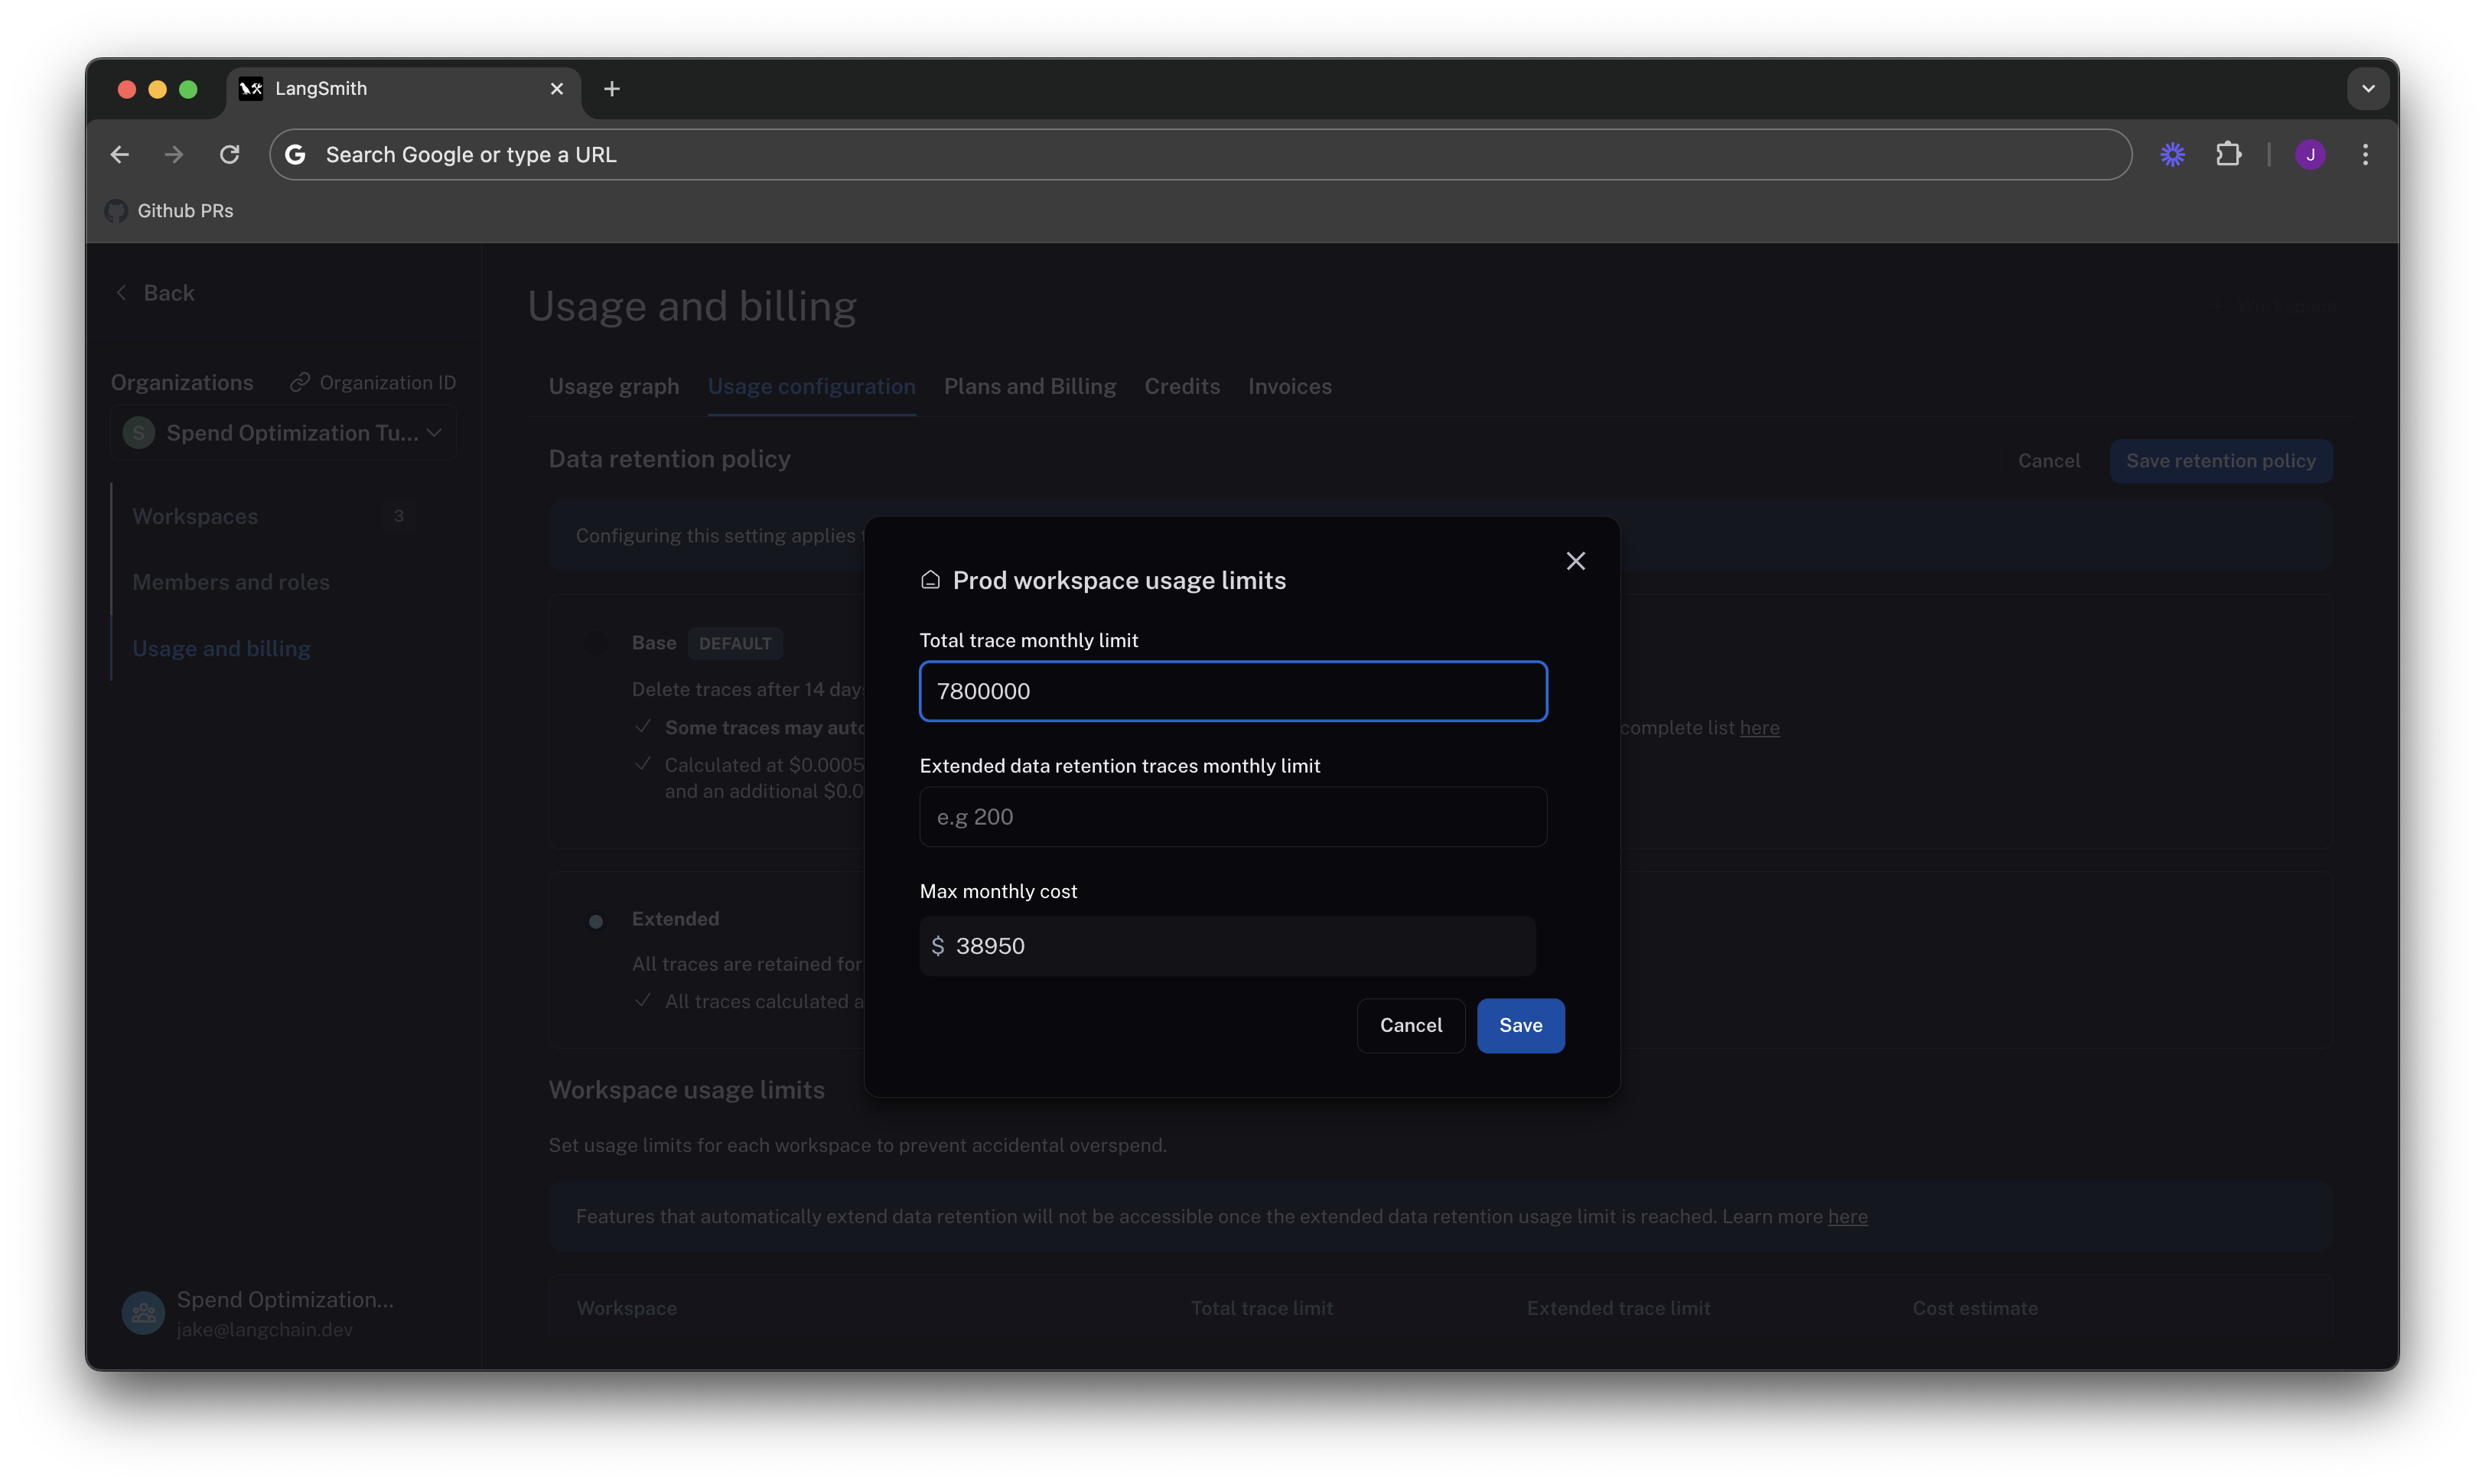
When set without the extended data retention traces limit, the maximum cost estimator assumes that all traces are using extended data retention.
Cut maximum spend with an extended data retention limit
From Optimization 1, you learned that the easiest way to cut cost was through managing data retention. The same is true for limits. If you only want to keep roughly 10% of traces to be around more than 14 days, you can set a limit on the maximum high retention traces you can keep. This would result in.10 * 7,800,000 = 780,000.
 The maximum cost is cut from ~40k per month to ~7.5k per month, because you no longer allow as many expensive data retention upgrades. This ensures that new users on the platform will not accidentally cause cost to balloon.
The extended data retention limit can cause features other than traces to stop working once reached. If you plan to use this feature, read more about its functionality and side effects.
Set dev/staging limits and view total spent limit across workspaces
Following a similar logic for thedev and staging environments, you can set limits at 10% of the production limit on usage for each workspace.
While this works with this usage pattern, setting good dev and staging limits may vary depending on your use case with LangSmith. For example, if you run evals as part of CI/CD in dev or staging, you may want to be more flexible with your usage limits to avoid test failures.
With the limits set, LangSmith shows a maximum spend estimate across all workspaces:
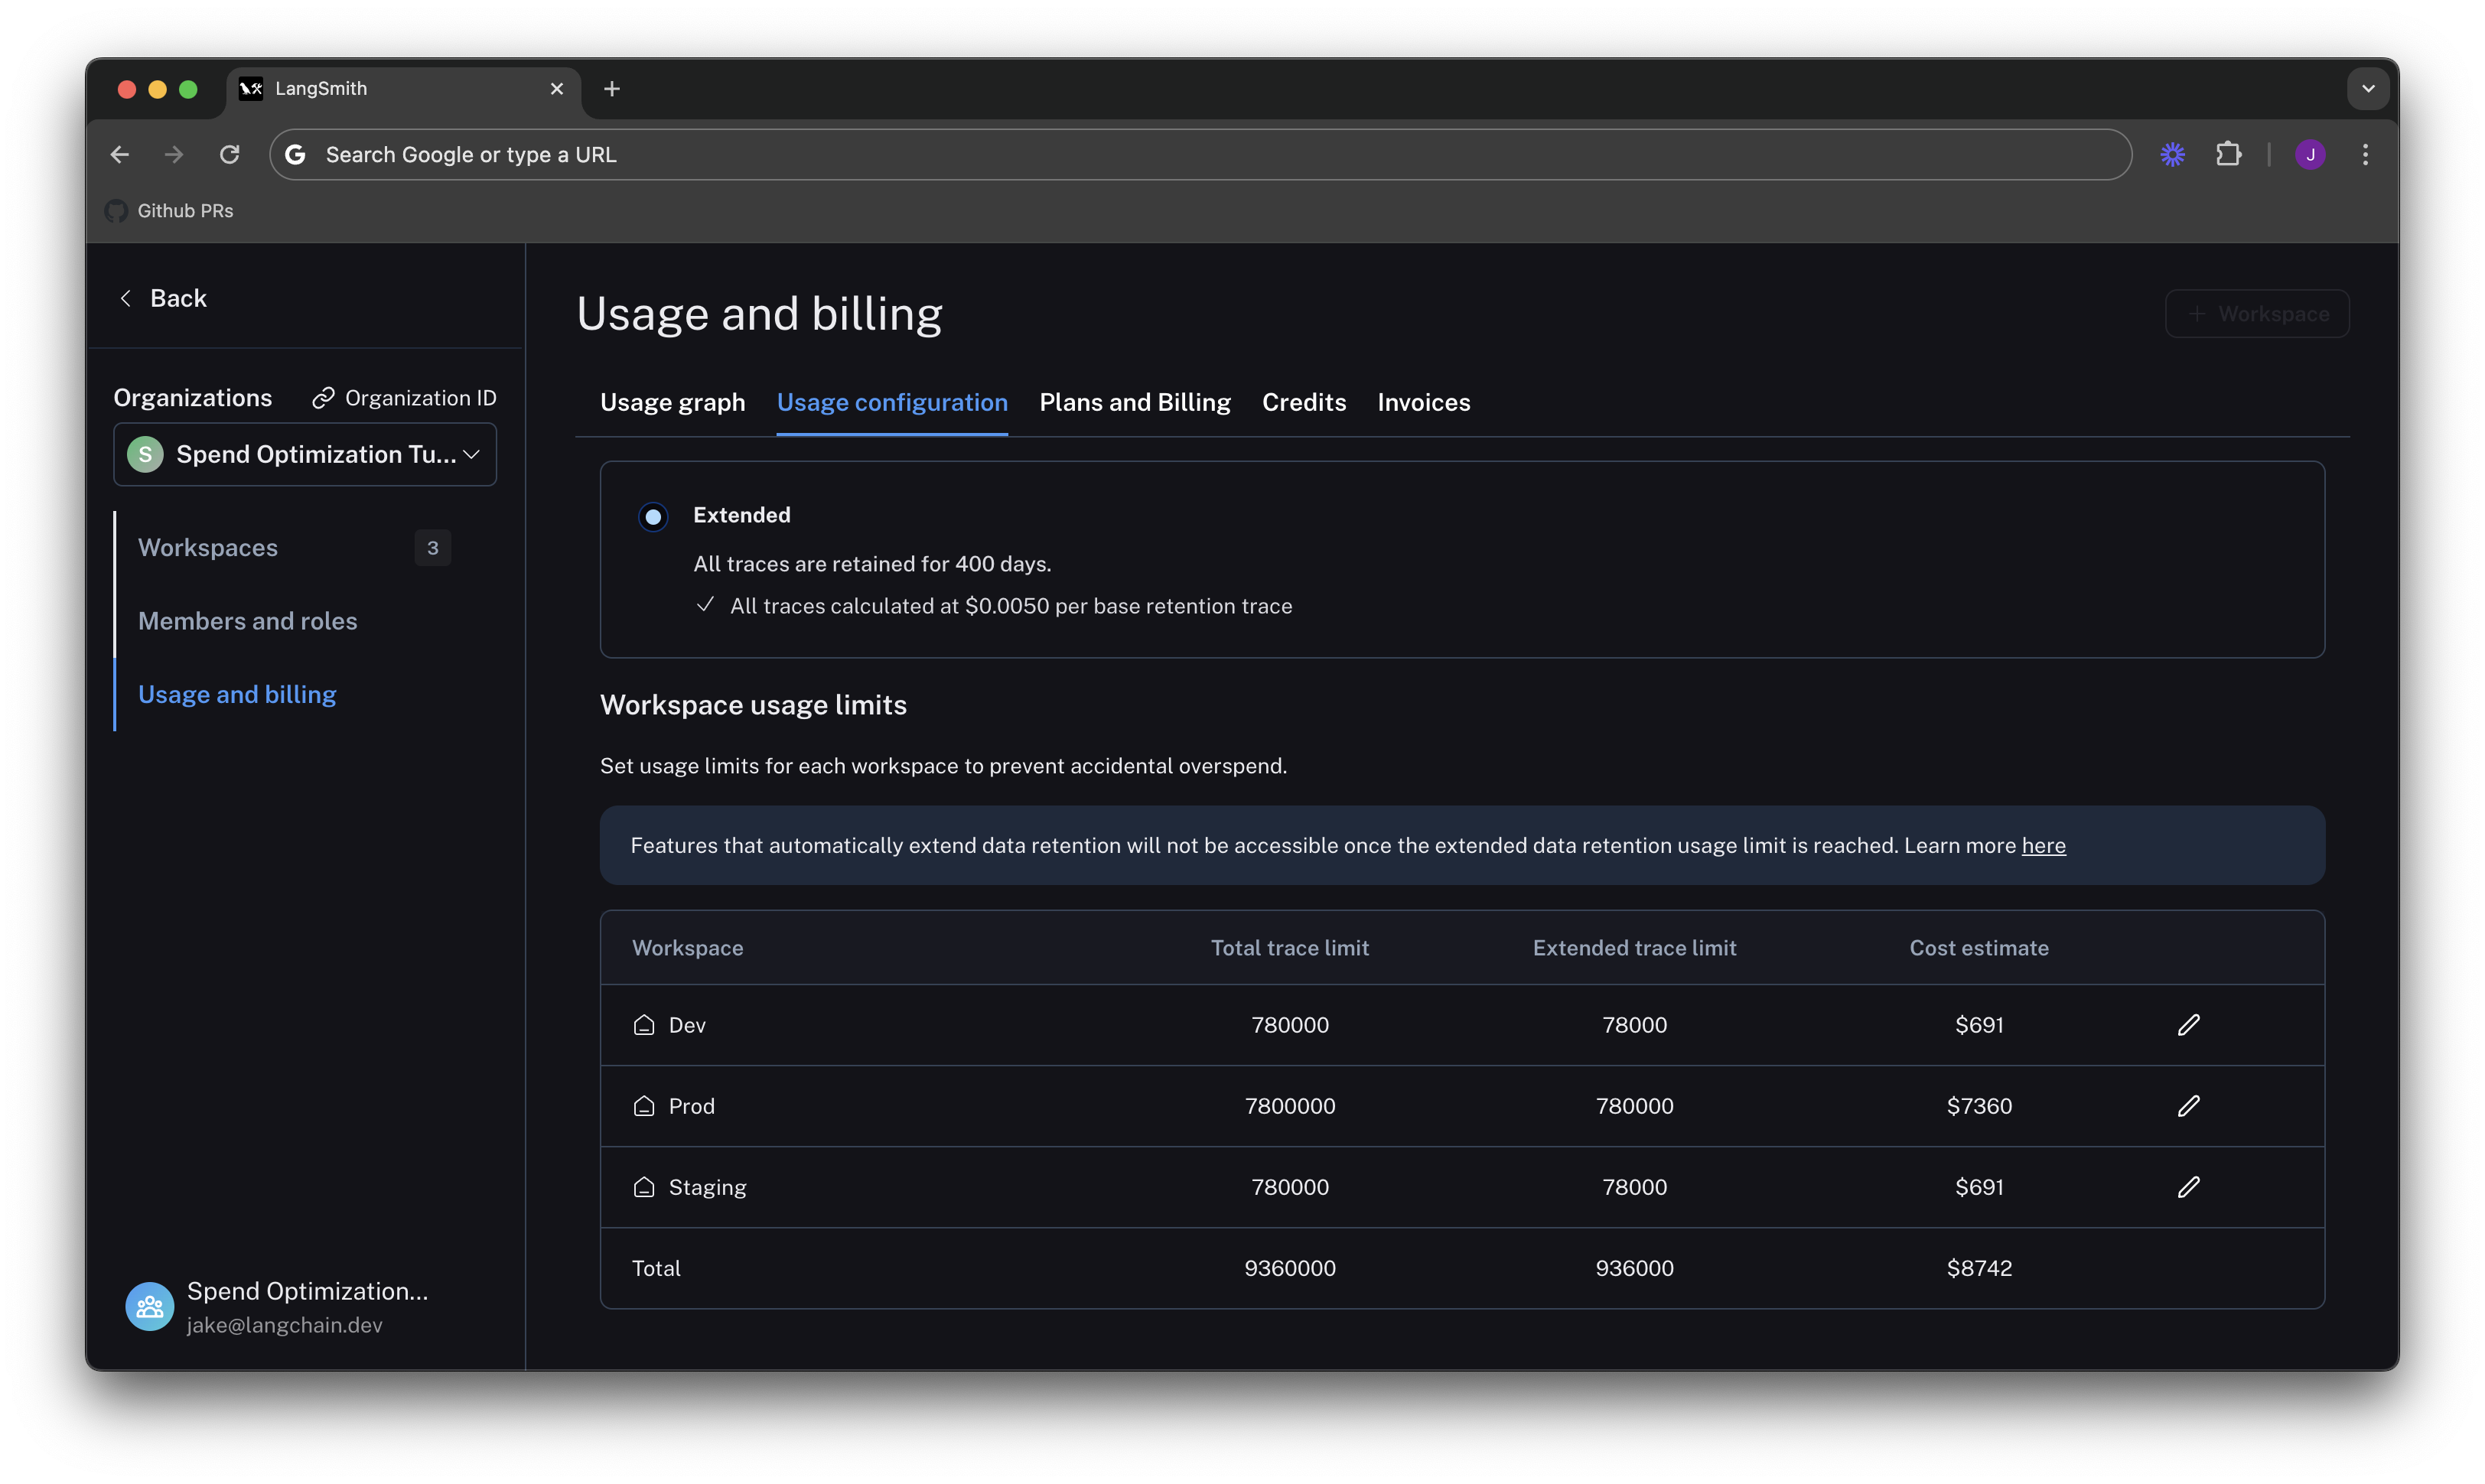 You can use the cost estimate to plan for your invoice total.