

概述
LLM 启用的最强大应用程序之一是复杂的问答(Q&A)聊天机器人。这些应用程序可以回答有关特定来源信息的问题。这些应用程序使用一种称为检索增强生成(Retrieval Augmented Generation)或 RAG 的技术。 本教程将展示如何在非结构化文本数据源上构建简单的问答应用程序。我们将演示:概念
我们将涵盖以下概念:- 索引:用于从源摄取数据并对其进行索引的管道。这通常在单独的过程中发生。
- 检索和生成:实际的 RAG 过程,在运行时获取用户查询并从索引中检索相关数据,然后将其传递给模型。
预览
在本指南中,我们将构建一个回答有关网站内容的问题的应用程序。我们将使用的具体网站是 Lilian Weng 的 LLM 驱动的自主智能体 博客文章,这使我们能够提出有关该文章内容的问题。 我们可以创建一个简单的索引管道和 RAG 链,用约 40 行代码完成此操作。请参阅下面的完整代码片段:展开查看完整代码片段
展开查看完整代码片段
Setup
Installation
This tutorial requires these langchain dependencies:LangSmith
您使用 LangChain 构建的许多应用程序将包含多个步骤和多次 LLM 调用。随着这些应用程序变得越来越复杂,能够检查链或智能体内部究竟发生了什么变得至关重要。执行此操作的最佳方法是使用 LangSmith。 在上面的链接注册后,请确保设置您的环境变量以开始记录跟踪:组件
我们需要从 LangChain 的集成套件中选择三个组件。 选择一个聊天模型:- OpenAI
- Anthropic
- Azure
- Google Gemini
- Bedrock Converse
- OpenAI
- Azure
- AWS
- VertexAI
- MistralAI
- Cohere
- Memory
- Chroma
- FAISS
- MongoDB
- PGVector
- Pinecone
- Qdrant
1. Indexing
索引通常按以下方式工作:- 加载:首先我们需要加载数据。这是通过文档加载器完成的。
- 分割:文本分割器将大型
Documents分解为较小的块。这对于索引数据和将其传递给模型都很有用,因为大块更难搜索,并且无法适应模型的有限上下文窗口。 - 存储:我们需要某个地方来存储和索引我们的分割,以便以后可以搜索它们。这通常使用向量存储和嵌入模型来完成。
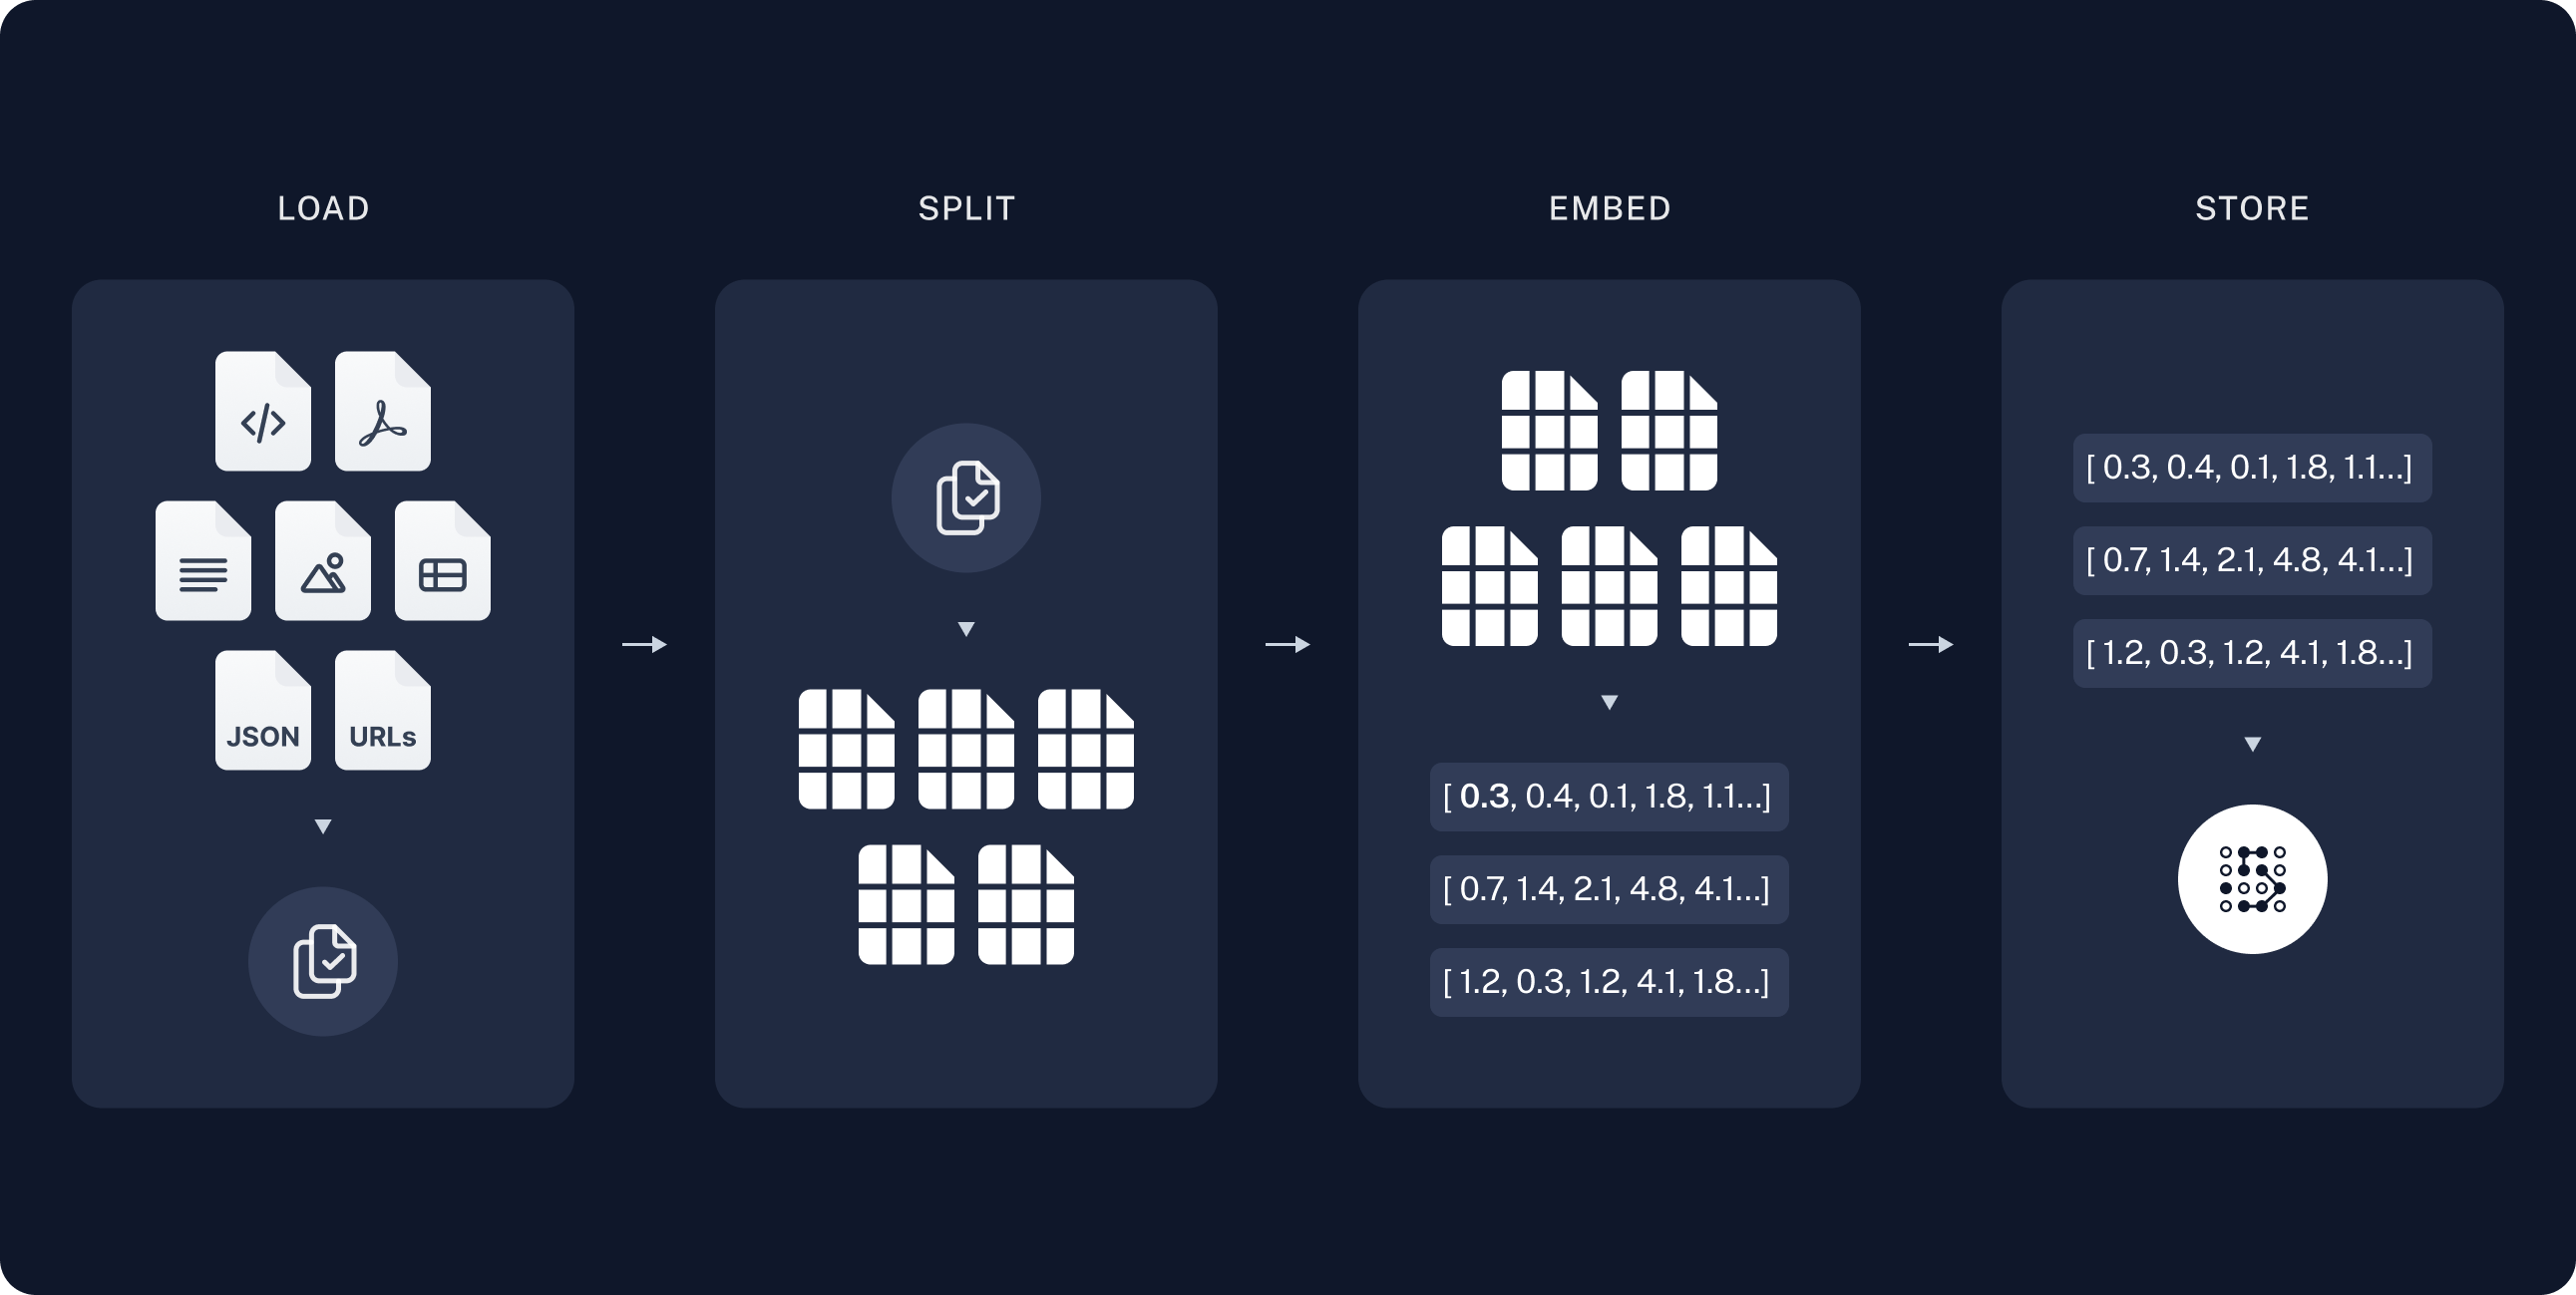
加载文档
我们首先需要加载博客文章内容。我们可以为此使用文档加载器,这些对象从源加载数据并返回 Document 对象列表。DocumentLoader:从源加载数据作为 Documents 列表的对象。
- 集成:160+ 个集成可供选择。
BaseLoader:基础接口的 API 参考。
分割文档
我们加载的文档超过 42k 个字符,这对于许多模型的上下文窗口来说太长了。即使对于那些可以将完整文章放入其上下文窗口的模型,模型也很难在非常长的输入中找到信息。 为了处理这个问题,我们将Document 分割成块以进行嵌入和向量存储。这应该有助于我们在运行时仅检索博客文章最相关的部分。
与语义搜索教程中一样,我们使用 RecursiveCharacterTextSplitter,它将使用常见分隔符(如换行符)递归分割文档,直到每个块达到适当的大小。这是通用文本用例推荐的文本分割器。
存储文档
现在我们需要索引我们的 66 个文本块,以便在运行时可以搜索它们。遵循语义搜索教程,我们的方法是将每个文档分割的内容嵌入并将这些嵌入插入到向量存储中。给定输入查询,我们可以使用向量搜索来检索相关文档。 我们可以使用在教程开始时选择的向量存储和嵌入模型,在单个命令中嵌入和存储所有文档分割。Embeddings:文本嵌入模型的包装器,用于将文本转换为嵌入。
VectorStore:向量数据库的包装器,用于存储和查询嵌入。
这完成了管道的索引部分。此时,我们有一个包含博客文章分块内容的可查询向量存储。给定用户问题,理想情况下我们应该能够返回回答问题的博客文章片段。
2. 检索和生成
RAG 应用程序通常按以下方式工作: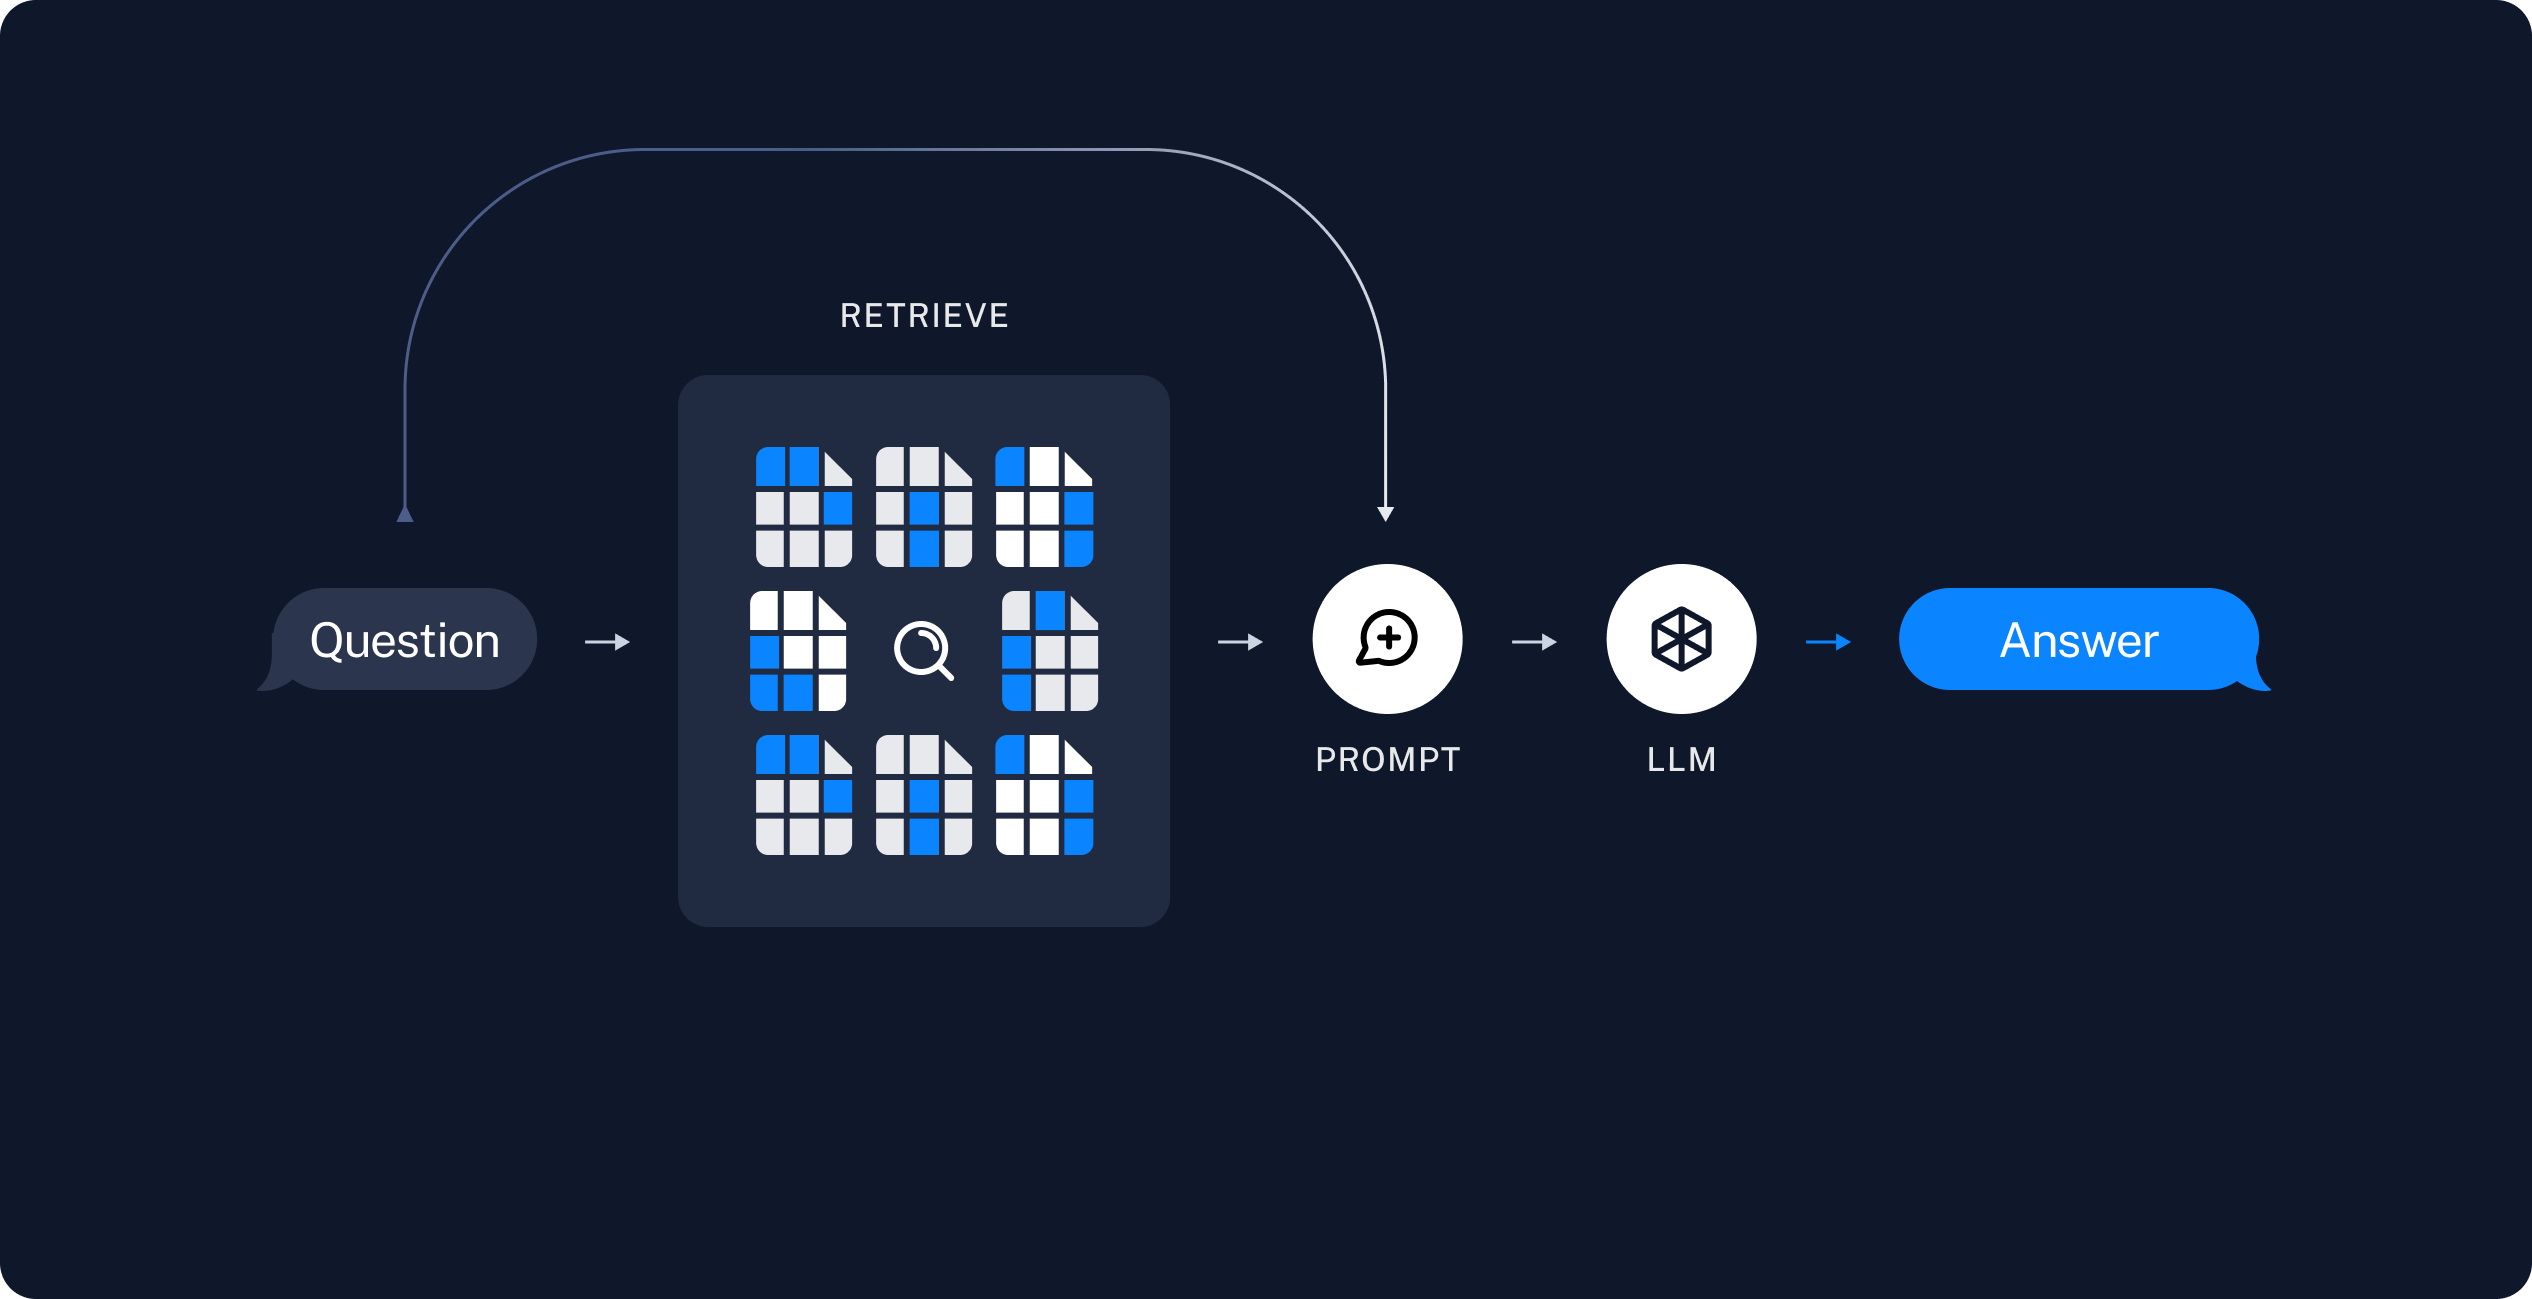 现在让我们编写实际的应用程序逻辑。我们想创建一个简单的应用程序,它接受用户问题,搜索与该问题相关的文档,将检索到的文档和初始问题传递给模型,并返回答案。
我们将演示:
现在让我们编写实际的应用程序逻辑。我们想创建一个简单的应用程序,它接受用户问题,搜索与该问题相关的文档,将检索到的文档和初始问题传递给模型,并返回答案。
我们将演示:
RAG 智能体
RAG 应用程序的一种形式是带有检索信息工具的简单智能体。我们可以通过实现一个包装向量存储的工具来组装一个最小的 RAG 智能体:- Generates a query to search for a standard method for task decomposition;
- Receiving the answer, generates a second query to search for common extensions of it;
- Having received all necessary context, answers the question.
RAG 链
在上面的智能体 RAG 公式中,我们允许 LLM 在生成工具调用以帮助回答用户查询时使用其判断力。这是一个良好的通用解决方案,但有一些权衡:| ✅ 优势 | ⚠️ 缺点 |
|---|---|
| 仅在需要时搜索 – LLM 可以处理问候、后续问题和简单查询,而不会触发不必要的搜索。 | 两次推理调用 – 执行搜索时,需要一次调用来生成查询,另一次调用来产生最终响应。 |
上下文搜索查询 – 通过将搜索视为带有 query 输入的工具,LLM 会制作自己的查询,这些查询包含对话上下文。 | 控制减少 – LLM 可能在真正需要时跳过搜索,或在不需要时进行额外搜索。 |
| 允许多次搜索 – LLM 可以执行多次搜索以支持单个用户查询。 |
Returning source documents
Returning source documents
The above RAG chain incorporates retrieved context into a single system message for that run.As in the agentic RAG formulation, we sometimes want to include raw source documents in the application state to have access to document metadata. We can do this for the two-step chain case by:
- Adding a key to the state to store the retrieved documents
- Adding a new node via a pre-model hook to populate that key (as well as inject the context).
后续步骤
现在我们已经通过 @[create_agent] 实现了一个简单的 RAG 应用程序,我们可以轻松地合并新功能并深入:
- 流式传输 token 和其他信息以获得响应式用户体验
- 添加对话记忆以支持多轮交互
- 添加长期记忆以支持跨对话线程的记忆
- 添加结构化响应
- 使用 LangSmith Deployments 部署您的应用程序